If you want to skip all of this next part, I’ve created a Github repo which contains the code to get you started. All you need to do is paste your API key and Sheet ID in.
If you want to see how it’s built, carry on reading.
Right! Now comes the fun bit…Create your page and call it what you like, we’ve called ours “citizen-feedback”. Style-wise this is completely up to you. I’ve gone for the white on blue style which you see in the interruption card pattern. We’ve used a different template than the standard citizen template, without the GOV.UK header and footer, with a slightly wider maximum width.
This is the HTML for the template:
In this gist: https://gist.github.com/charge-valtech/dca0646d454f786352bba68d65425843
The first part of your page will be the HTML. Here is what we have, using inline SVG for a few icons:
In this gist: https://gist.github.com/charge-valtech/77ae65277104a1f2c710bad127e6e0be
The HTML should be fairly self-explanatory. I will point out bits of it as we step through the JavaScript. I’ll explain now, that I have never professed to be a JS engineer and I am unashamed in my use of jQuery to prototype. It’s something that I’ve used for my entire career and for me it works, I can understand it and it’s quick for me. By all means, if you’re more comfortable using vanilla JS or another library then please do. I did consider re-writing this in JavaScript, but that’d take me a lot longer and I’d run the risk of not being able to understand it going forwards. So… there’s a lot of jQuery here, OK! *gasp*
So, for the scripts to work just on this page, add a new section under your content block:
{% block pageScripts %}

{% endblock %}
I’ve then brought in moment.js, which we’ll use to prettify the dates:
<script src="/public/javascripts/moment.js"></script>
The first block of code within this is nothing to do with the feedback, it’s just a little countdown timer, which only shows if the url has `?auto-refresh=true` This is optional, but I thought it was a good feature if you wanted the feedback page on the TV refreshing every 30 seconds.:
{% if data['auto-refresh'] === "true" %}

    <script>

      var $countdownVisual = $('#countdownVisual'),

          countdownTime = Number($countdownVisual.text()),

          isPaused = false,

          counter = 0,

          interval = setInterval(function() {

                      if(!isPaused) {

                          counter++;

                          $countdownVisual.text(countdownTime - counter);

                          if (counter == 30) {

                              //Refreshes the window

                              document.location.reload(true)

                          }

                        }

                    }, 1000);


      $('.pause-button').on('click', function(e) {

        e.preventDefault();


        isPaused = true;


        $(this).hide();

        $('.play-button').show();

      });


      $('.play-button').on('click', function(e) {

        e.preventDefault();


        isPaused = false;

        $(this).hide();

        $('.pause-button').show();

      });


    </script>

  {% endif %}
I’ve then got another <script> block and the first thing inside there is two functions which we’ll make use of later:
function randomIntFromInterval(min,max)

      {

        return Math.floor(Math.random()*(max-min+1)+min);

      }


      function convertDigitIn(str){

        return str.split('/').reverse().join('-');

      }
We then set some global variables which we’ll use in the rest of the script to read the Google Sheets data:
var sheetsURL = "https://sheets.googleapis.com/v4/spreadsheets/",

          sheetID = "{{googleSheetID}}",

          apiKey = "{{googleSheetApiKey}}",

          $feedbackContainer = $('#feedbackContainer'),

          responsesURL = sheetsURL+sheetID+"/values/Satisfaction%20score!A4:B4?key=" + apiKey;
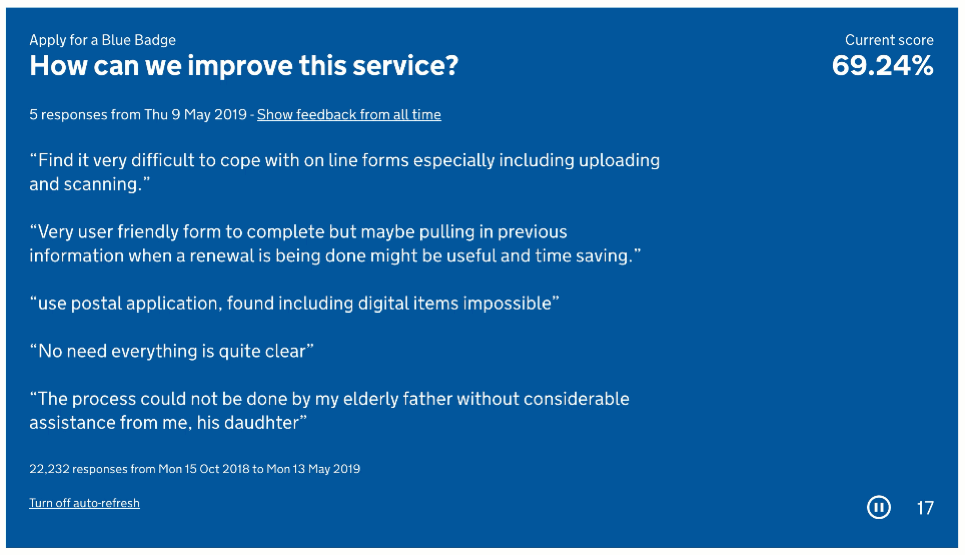
The first three variables are concatenated in different ways to get the JSON. We then set the empty #feedbackContainer div as a variable. responsesURL uses the range in our sheet A4:B4 that has the total responses plus the satisfaction score. This means we don’t need to touch the code every time we get new feedback as the total number will be read from the sheet.
So now we make the first call to our sheet:
// Get total responses

      $.getJSON( responsesURL ).done(function( data ) {

        var total = data.values[0][0],

            score = data.values[0][1],

            maxResponses = total - 5,

            rangeStart = randomIntFromInterval(2,maxResponses),

            rangeEnd = rangeStart + 4,

            range = "A"+rangeStart+":C"+rangeEnd,

            feedbackURL = sheetsURL+sheetID+"/values/Feedback!"+range+"?key=" + apiKey,

            datesURL = sheetsURL+sheetID+"/values/Feedback!A2:A?key=" + apiKey;


       // Show the satisfaction score

        $('#satisfactionScore').html(score);


      // We’ll put the rest of the code inside here


});
Google Sheets will bring back JSON with an object called `values`. The first item will be the total and the second the score. We then subtract 5 from the total to get the maximum row we want to go up to, as we want 5 responses brought back each time. In `rangeStart` we use the function we wrote earlier to get a random interval between the first row of feedback and the last (minus 5). That combined with `rangeEnd` will give us the two integers to bring back, which we put into `range`. This is looking at column C which contains the feedback, which is all concatenated into `feedbackURL` to give us our second lot of JSON. `datesURL` is used later on. As we’ve brought back the score, we’ll add that into the span `#satisfactionScore` which is in the layout.
Next is to get the 5 responses:
// Display 5 responses

        $.getJSON( feedbackURL ).done(function( data ) {

          var values = data.values,

              startDate = values[0][0],

              justDate = startDate.toString().slice(0, -6),

              reversedDate = convertDigitIn(justDate),

              formattedDate = moment(reversedDate).format('ddd D MMM YYYY');


          $('#loadingContainer').hide();


          $feedbackContainer.prepend('<p class="govuk-body-l"><small>5 responses from ' + formattedDate + '</small>’);
Using the `feedbackURL`, we’ll bring back an object with 5 items which will each include the date-time, name of the service and then the feedback. We don’t do anything with the middle column. The first few variables are getting the date-time, then taking off the last 6 characters (time and some spaces). We then use the other function from the start which reverses the date and separates with dashes to put it into the format for moment.js. We then feed it into moment.js to format nicely. We hide the loading container as we know we have the data now. Then we add in some html which contains the date that the responses are from.
Now to actually get the feedback.
          $.each( values, function( i, value ) {

            var feedback = value[2].replace('’', '\'');


            if(feedback.indexOf('Rating of') >= 0 ||

               feedback.length < 4  ||

               feedback == 'apply-blue-badge' ){


              $feedbackContainer.append('<p class="govuk-body-l" data-removed-text><i>Text removed</i></p>');


              if($('[data-removed-text]').length > 3) {

                window.setTimeout(function(){ document.location.reload(true); }, 2000)

              }


            } else {

              $feedbackContainer.append('<p class="govuk-body-l">“' + feedback + '”</p>');

            }

          });

        });
We iterate through each object, storing the feedback in a variable. I’ve then chosen to filter out the feedback that contains generated text from GOV.UK, along with short responses (N/A is one you see a lot). When filtering out the text we replace it with text saying “Text removed”. Then we check if there’s more than 3 of those, if so we refresh the window after 2 seconds. For the feedback that isn’t filtered, we append it to the `$feedbackContainer` div.
Now for the final piece of code which displays the text at the bottom of the page.
// Display total responses and time period

        $.getJSON( datesURL ).done(function( data ) {

          var values = data.values,

              startFullDate = values[0],

              justStartDate = startFullDate.toString().slice(0, -6),

              reversedStartDate = convertDigitIn(justStartDate),

              formattedStartDate = moment(reversedStartDate).format('ddd D MMM YYYY'),

              responseLength = values.length-1,

              endFullDate = values[responseLength],

              justEndDate = endFullDate.toString().slice(0, -6),

              reversedEndDate = convertDigitIn(justEndDate),

              formattedEndDate = moment(reversedEndDate).format('ddd D MMM YYYY');


          $('#feedbackDateRange').html("<small>" + responseLength.toLocaleString('en') + " responses from " + formattedStartDate + " to " + formattedEndDate + "</small>");

        });
Using the URL we created earlier, we go through the first column and bring back the data. The first object will contain the date from the first bit of data, which we format in the same way as earlier. We then get the last object using the length of the array we brought back which will contain the most recent date, again formatting in the same way. All of this is then added to the `#feedbackDateRange` paragraph at the bottom of the page.
The final thing you’ll want to do is restrict access for your API key to just your local environment and the URL for your Heroku prototype.