


novembro 08, 2016
Telligent Community is a free commercial community platform that includes a suite of social applications (forums, wikis, blogs, etc.) and social services (likes, ratings, reviews, comments) that you can use to create communities.
You can run Telligent Community side-by-side with Sitecore. Telligent Community is designed to easily integrate with 3rd party Web Content Management platforms. Integration can be as simple as single sign-on (SSO), aggregating Telligent Community RSS feeds, embedding Telligent Community iFrame widgets or can be more natively integrated directly through Telligent Community’s platform API (RESTful web services) and native SDKs designed specifically for Web Content Management Systems (such as Sitecore).
In this article, we will be using single sign-on (SSO). Single sign-on (SSO) is a session and user authentication service that permits a user to use one set of login credentials (e.g. name and password) to access multiple applications. In other words, the user will be authenticating to Sitecore (with its Sitecore credentials) and automatically be authenticated to Telligent Community.
Important: SSO uses cookies, therefore your web application and your community site must exist on the same domain. For example, your Sitecore instance is http://sitecoresandbox.local.nlc, therefore your Telligent Community should be installed as http://telligentcommunity.local.nlc.
I am assuming you have already installed Telligent Community. If you have not installed Telligent Community yet, please read Install Telligent Community.
To set up single sign-on (SSO) from Sitecore 8 to Telligent Community you have to set some configurations on Telligent Community and add some code to Sitecore 8.
I uploaded the complete code to a Github repository.
Demo
Here is a demo of what is going to happen. I have a user called "Alex Jones" (alex) who will authenticate to Sitecore and will automatically be authenticated to Telligent Community as well. On top of that, "Alex Jones" does not have a user in Telligent Community yet, so Telligent Community will automatically create a user for "Alex Jones".
Configuring Telligent Community
The following are the steps to set up SSO in Telligent Community build version 9.2.0.2268. If the Telligent version that you are using is different than mine, please contact Telligent support for more information.
Before proceeding, it is important to know that once you set up SSO Authentication, Telligent Community will not be using its own login form anymore. Telligent Community will start using the login form that you'll be creating in the next steps.
If you somehow mess with the login form or need to authenticate to Telligent Community with a Telligent user (not a Sitecore one), don't panic! Telligent Community has an emergency URL that you can use: http://[telligentcommunity]/ControlPanel/localaccess.aspx.
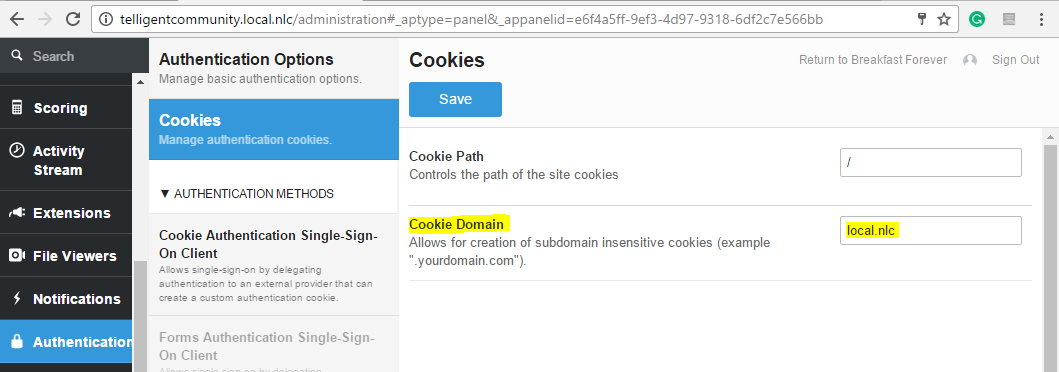
To set up "Cookie Authentication Single-Sign-On Client" navigate to http://[telligentcommunity]/administration > Authentication > Cookies and in "Cookie Domain" add the domain of your site. In this example, I am using "local.nlc". Click on the "Save" button to update this configuration.
The next step is to set up the Cookie name that Telligent Community will be reading, the URL for the login page, and the URL for the logout page.
- Navigate to http://[telligentcommunity]/administration>Authentication > AUTHENTICATION METHODS > Cookie Authentication Single-Sign-On Client;
- Check the option "Enabled" ;
- In the field "Authenticated user cookie name", add the value "SitecoreSandboxUser". This will be the name of the cookie that Telligent Community will be expecting;
- Keep the fields "Cookie key name for username value", "Cookie key name for email address value", "Cookie key name for expiry date" with their default value. Telligent Community will be expecting a cookie with a value similar to this: username=maria&emailAddress=maria@mailinator.com&commonname=Maria Lisboa;
- Keep the field "Allow automatic registration for new users" checked. This field indicates that if you have a user in Sitecore, for example, named "Paula" and she doesn't exist in Telligent Community, once you authenticate with this user Telligent Community will create it automatically;
- Add the following value to the field "The URL for the login page": http://[sitecore]/external/OAuth/Login. This is the URL that Telligent Community will be using to authenticate your user after you save the SSO configurations;
- Add the following value to the field "The URL for the logout page": http://[sitecore]/external/OAuth/Logout;
- Click on the "Save" button to update this configuration.
All done. Now don't forget to clear the cookies in your browser (otherwise you'll remain logged in with the Telligent Community user and will not be able to logout).
Once you try to log in again to Telligent Community you will be redirected to the login URL you previously inputted.
Configuring Sitecore 8
As we previously saw, Telligent Community requires you to create two URLs: one for the login page and another for the logout page.
In this article, we will create an ASP .NET MVC Controller named "OAuthController" with two Actions: "Login" and "Logout".
- Login: will be responsible for checking if the user and password are valid in Sitecore and creating the Cookie that the Telligent Community uses.
- Logout: will be responsible for clearing out the Cookie that the Telligent Community uses and thus logging the user out.
Both URLs will be accessed through the path http://[sitecore]/external/OAuth/Login (or Logout).
Notice that "external" is an MVC route. Sitecore allows custom ASP.NET MVC routes to be used on a Sitecore site. To do that you will need to create a custom processor to register MVC route. The following are the steps to define custom ASP.NET MVC routes in a way that does not conflict with the default Sitecore routes.
In your Visual Studio solution, create a class named "RegisterCustomRoute" and add the following code:
using Sitecore.Pipelines;

using System.Web.Mvc;

using System.Web.Routing;

namespace SC81.Sandbox.CustomProcessors

{

     public class RegisterCustomRoute : Sitecore.Mvc.Pipelines.Loader.InitializeRoutes

     {

         public override void Process(PipelineArgs args)

         {

             RouteTable.Routes.MapRoute("CustomRoute",

                 "external/{controller}/{action}/{id}", // URL with parameters

                  new { id = UrlParameter.Optional });

         }

     }

}
Next, create a folder named "Z_CustomConfigs" under /App_Config/Include directory and add a file named "CustomRouteConfiguration.config" with the following markup:
<?xml version="1.0" encoding="utf-8"?>

<configuration xmlns:patch="http://www.sitecore.net/xmlconfig/">

     <sitecore>

     <pipelines>

       <initialize>

         <processor type="SC81.Sandbox.CustomProcessors.RegisterCustomRoute, SC81.Sandbox"

           patch:before="processor[@type='Sitecore.Mvc.Pipelines.Loader.InitializeRoutes, Sitecore.Mvc']"/>

       </initialize>

       </pipelines>

   </sitecore>

</configuration>
*Your processor type may be different than mine depending on the Assembly name that you gave to your Visual Studio project.
Don't forget to publish your Visual Studio solution to the directory where the Sitecore files are located.
Read How to register custom ASP.NET MVC routes in Sitecore for more information.
Let's create a class to represent the login model. Create a class named "LoginBoxModel" and add the following code:
using System.ComponentModel.DataAnnotations;

namespace SC81.Sandbox.Models

{

     public class LoginBoxModel

     {

         [Required]

         public string UserName { get; set; }

         [Required]

         public string Password { get; set; }

              }

}
Now, add a new Controller to your Visual Studio project, give it the name "OAuthController", and add the following code:
using SC81.Sandbox.Authentication;

using SC81.Sandbox.Models;

using System;

using System.Web.Mvc;

namespace SC81.Sandbox.Controllers

{

     [Route(Name = "external")]

     public class OAuthController : Controller

     {

         // GET: Login

         public ActionResult Login(string returnUrl)

         {

             ViewBag.ReturnUrl = returnUrl;

             var model = new LoginBoxModel();

             return View(model);

         }

     }

}
Notice the attribute "Route" in the beginning of the class indicating that it belongs to the route named "external".
Now, in your Visual Studio project create a view named "Login.cshtml" under the folder /Views/OAuth (create the folder OAuthr if it was not automatically created) and add the following code:
@model SC81.Sandbox.Models.LoginBoxModel

@{

     ViewBag.Title = "LoginBox";

}

<div class="container">

     <div class="card card-container">

         <img id="profile-img" class="profile-img-card" src="//ssl.gstatic.com/accounts/ui/avatar_2x.png" />

         <p id="profile-name" class="profile-name-card"></p>

         @using (Html.BeginForm(new { returnUrl = ViewBag.ReturnUrl }))

         {

             if (!ViewData.ModelState.IsValid)

             {

                 <div class="alert alert-danger">

                     @Html.ValidationMessage("FormInvalid")

                     @Html.ValidationMessage("FormError")

                     @Html.ValidationMessage("LoginInvalid")

                 </div>

             }

             <div class="form-signin">

                 <span id="reauth-email" class="reauth-email"></span>

                 @Html.TextBoxFor(model => model.UserName, new { @class = "form-control", placeholder = "User Name", required = "required", autofocus = "autofocus" })

                 @Html.PasswordFor(model => model.Password, new { @class = "form-control", placeholder = "Password", required = "required" })

                 <button class="btn btn-lg btn-primary btn-block btn-signin" type="submit">Sign in</button>

             </div>

         }

         <a href="#" class="forgot-password">

             Forgot the password?

         </a>

     </div>

</div>
*I am using Bootstrap framework in my project. The design of the login page is a Bootstrap 3.3.0 Snippet created by cesiztel and available on Bootsnipp.
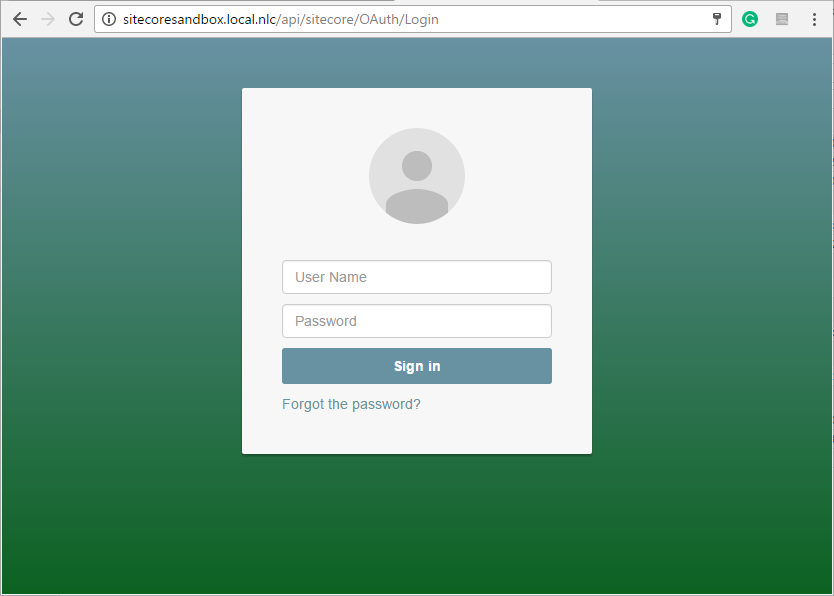
By now, if you access http://[site].[domain]/external/OAuth/Login you should see the login page:
Now, let's create a class named "TelligentSSOManager" which will be responsible for managing the login / logout both in Telligent Community and Sitecore. Basically, TelligentSSOManager will be adding / deleting the cookie that Telligent Community will read to authenticate the Sitecore user.
Back to Visual Studio, add a new class named "TelligentSSOManager" and add the following code:
using System; using System.Web;

using System.Linq;

using Sitecore.Security.Authentication;

using Sitecore;

namespace SC81.Sandbox.Authentication

{

     public static class TelligentSSOManager

     {

         public const bool EncryptEnabled = false;

         public const string ExtranetDomain = "extranet";

         public const string CookieDomain = "local.nlc";

         public const string AuthenticatedUserCookieName = "SitecoreSandboxUser";

         public const string CookieKeyNameForUsername = "username";

         public const string CookieKeyNameForEmail = "emailAddress";

         public const string CookieKeyNameForDisplayName = "commonname";

              public static void Login(string userName)

         {

             var scUser = Sitecore.Security.Accounts.User.FromName(userName, true);

             if (scUser == null) return;

             var customProfile = scUser.Profile;

             var userId = scUser.LocalName;

             var email = customProfile.Email;

             var displayName = customProfile.FullName;

             var cookieName = AuthenticatedUserCookieName;

             if (HttpContext.Current.Request.Cookies[cookieName] != null)

                 return;

             var cookieValue = string.Format("{0}={1}&{2}={3}&{4}={5}", CookieKeyNameForUsername, userId,

                                                                    CookieKeyNameForEmail, email,

                                                                    CookieKeyNameForDisplayName, displayName);

                         var cookie = new HttpCookie(AuthenticatedUserCookieName, cookieValue)

             {

                 HttpOnly = true,

                 Domain = CookieDomain,

                 Expires = DateTime.Now.AddMonths(6)

             };

             HttpContext.Current.Response.SetCookie(cookie);

         }

         public static void Logout()

         {

             var cookieName = AuthenticatedUserCookieName;

             if (HttpContext.Current.Request.Cookies[cookieName] == null)

                 return;

             var cookieToSave = new HttpCookie(cookieName)

             {

                 Expires = DateTime.Today.AddDays(-10),

                 Domain = CookieDomain

             };

             HttpContext.Current.Response.Cookies.Add(cookieToSave);

             AuthenticationManager.Logout();

         }

     }

}
The code above contains two methods:
- Login: this method is responsible for authenticating to Sitecore, creating the cookie that Telligent Community is expecting and thus saving this cookie.
- Logout: this method is responsible for deleting the cookie that Telligent Community is expecting and logging out from Sitecore.
Notice that the constants being used in this class contain exactly the same values that we inputted when we set up the SSO authentication in Telligent Community:
- CookieDomain = "local.nlc";
- AuthenticatedUserCookieName = "SitecoreSandboxUser";
- CookieKeyNameForUsername = "username";
- CookieKeyNameForEmail = "emailAddress";
This cookie is not encrypted so never use this example in a production environment. Telligent Community does support encryption such as AES-HMAC and AES-GCM. You may set this up in http://[telligentcommunity]/administration>Authentication > AUTHENTICATION METHODS > Cookie Authentication Single-Sign-On Client > Encryption Options. That will require you to encrypt the cookie value in your code using the encryption algorithm selected and the Encryption and HMAC keys set (this is not covered in this article).
Now, replace the "OAuthController" code with the following:
using SC81.Sandbox.Authentication;

using SC81.Sandbox.Models;

using System;

using System.Web.Mvc;

namespace SC81.Sandbox.Controllers

{

     [Route(Name = "external")]

     public class OAuthController : Controller

     {

         // GET: Login

         public ActionResult Login(string returnUrl)

         {

             ViewBag.ReturnUrl = returnUrl;

             var model = new LoginBoxModel();

             return View(model);

         }

         [HttpPost]

         public ActionResult Login(LoginBoxModel model, string returnUrl)

         {

             if (!ModelState.IsValid)

                 return this.View(model);

             string domain = TelligentSSOManager.ExtranetDomain;

             string username = model.UserName;

             if (!string.IsNullOrEmpty(domain) && !String.IsNullOrWhiteSpace(username) && !username.Contains("\\"))

                 username = domain + "\\" + username;

             if (!Sitecore.Security.Authentication.AuthenticationManager.Login(username, model.Password))

             {

                 ModelState.AddModelError("LoginInvalid", "Login invalid");

                 return this.View(model);

             }

             TelligentSSOManager.Login(username);

             if (!string.IsNullOrEmpty(returnUrl))

                 return this.Redirect(returnUrl);

             return this.Redirect("/");

         }

         public ActionResult Logout(string returnUrl)

         {

             TelligentSSOManager.Logout();

             return this.Redirect(returnUrl);

         }

     }

}
The code above contains two new methods:
- Login (with HTTP post): this method is responsible for validating the login information submitted from the login page, checking if the credentials informed are valid in Sitecore and then calling TelligentSSOManager.Login() method to create the cookie that Telligent Community will be reading. Finally, if everything goes well, this method redirects to the URL informed in the "returnUrl" parameter;
- Logout: this method is responsible for calling TelligentSSOManager.Logout() method and redirecting to the URL informed in the "returnUrl" parameter.
Notice that we are using the "extranet" Sitecore domain which means all the users are expected to belong to "extranet" domain in Sitecore. If you want to user another domain, such as "sitecore", update the constant TelligentSSOManager.ExtranetDomain to the desired domain.
To test your changes, simply create a new user in Sitecore and then try to authenticate to Telligent Community. If the user doesn't exist in Telligent Community, it will be automatically created.
That's it for today, folks! Hope this article gives you an idea of how to integrate your Sitecore instance with Telligent Community.


