


The steps/screenshots are from an Objective-C implementation but an implementation using Swift is broadly the same. If you’re after a step by step guide for Android I’d recommend Jan Exner’s series, which starts here.
Whislt I had experience with the v4 SDKs before I began digging into the AEP SDKs, I had never opened an Xcode project before and I had no idea what CocoaPods was. Consequently, the first chapter below will cover some basic steps around podfiles, in order to get you to a point where you’ve got your .xcworkspace file open in Xcode with the relevant pods installed.
If you are already familiar with podfiles and Xcode then skip to the third section.
#1 Getting started with CocoaPods
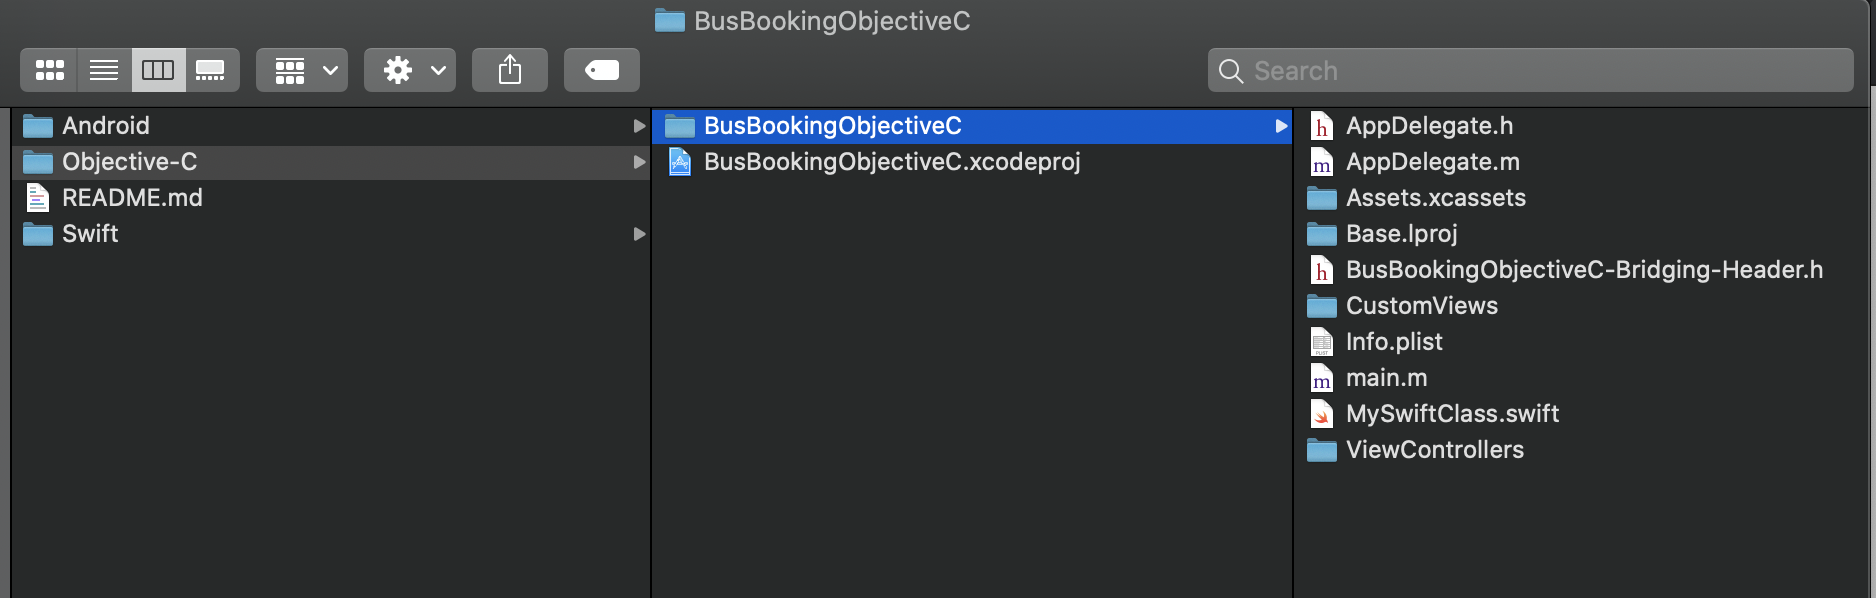
If you’re not an app developer and/or don’t have access to an app project, you can download Adobe’s sample apps from github. Once those files are unpacked, you’ll be faced with an Objective-C folder that contains the main BusBookingObjectiveC folder and the .xcodeproj file. All I’ll say at this point is don’t be tempted to open the Xcode project file, you will never actually need to.
I won’t go through how to install CocoaPods because the steps are explained very clearly in their getting started guide. Similarly, I’ll assume that Xcode has been installed. The first thing you need to do is create a podfile: open your mac terminal, navigate to the Objective-C folder using the cd command and then run pod init.
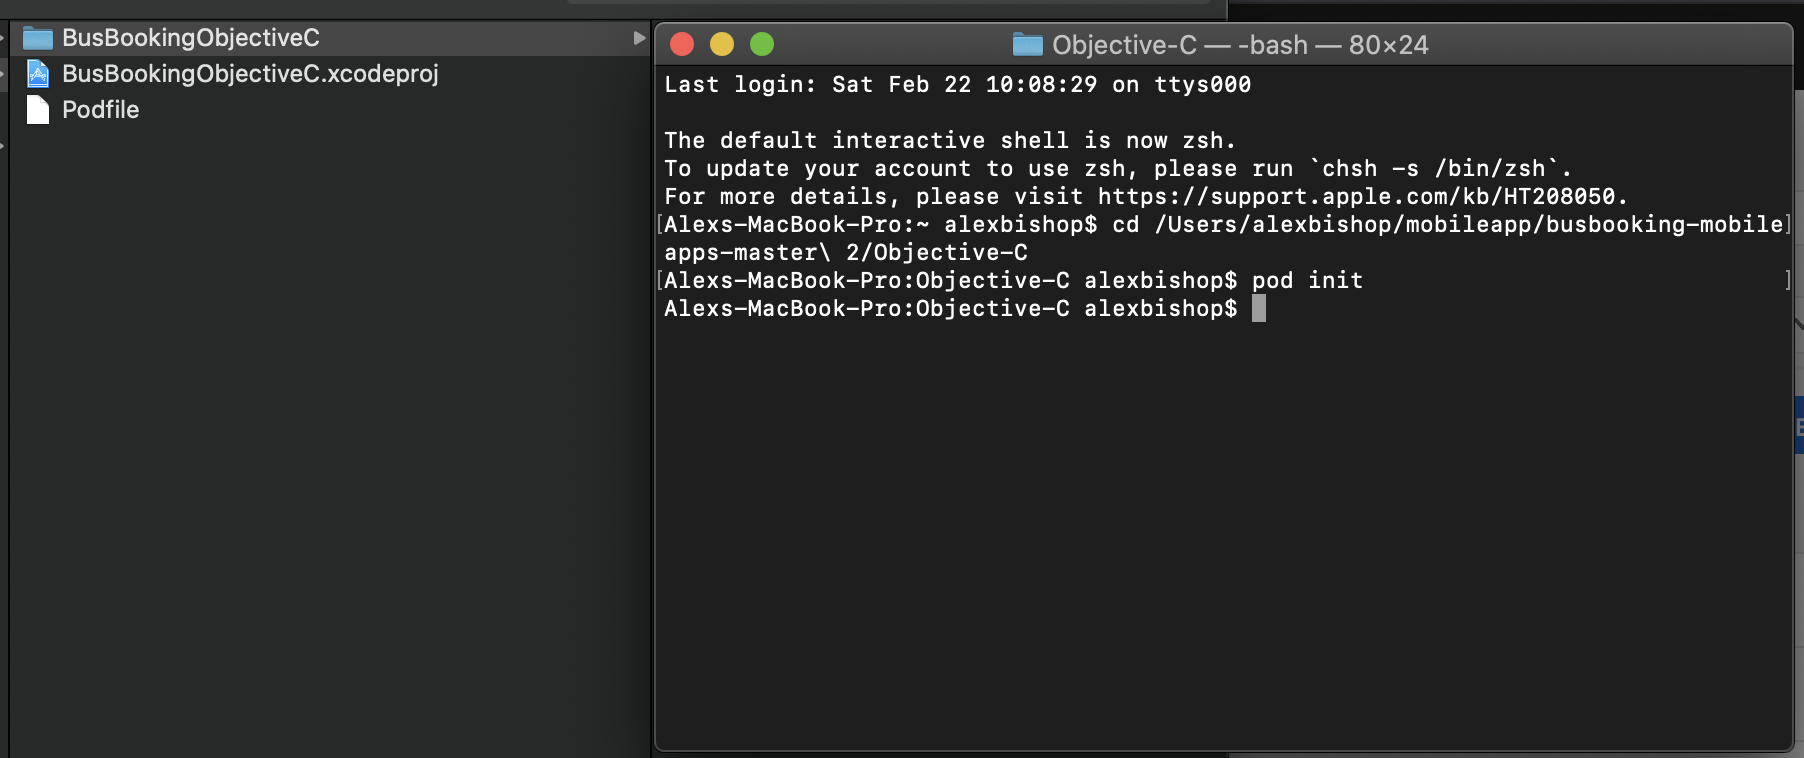
If the command was executed successfully then a file called Podfile will be added to your Objective-C directory. You can open the Podfile with any text editor— currently, there’s not much to see, but we’re now at the point where the installation instructions in Launch can come into play.
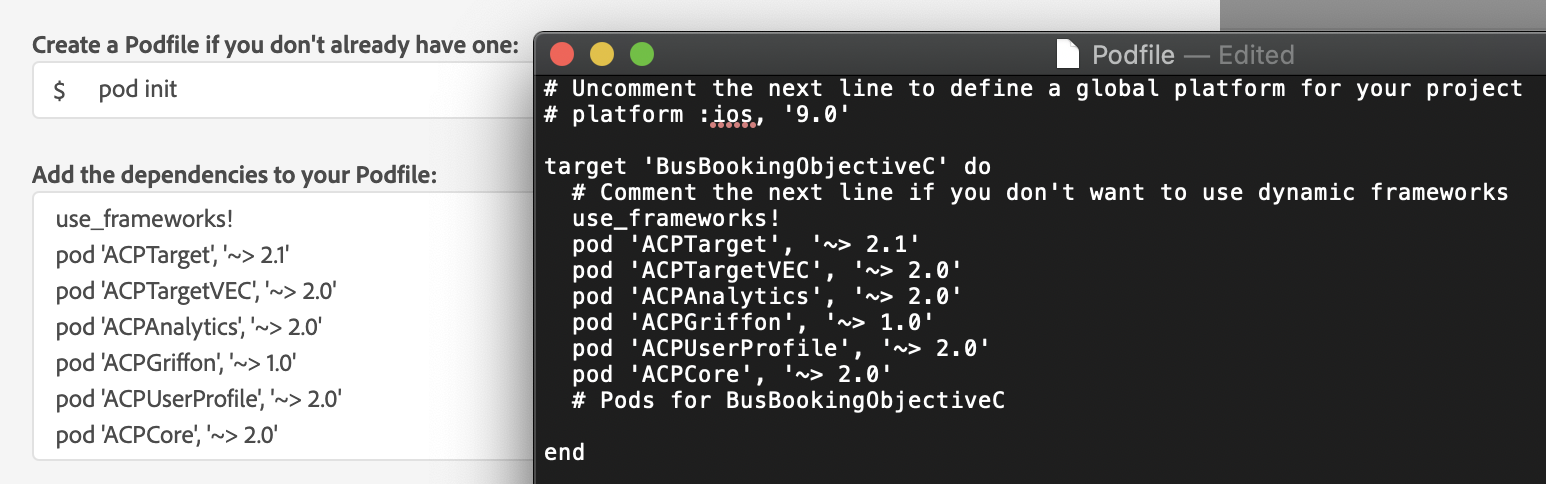
#2 Populating your Podfile
The Environments tab within your Launch mobile property will look very familiar to those who have used a web property before. However, if you’ve never used Launch before there’s no cause for concern. The main difference is that when you click on the Install box there is a set of implementation instructions instead of the script embed code.
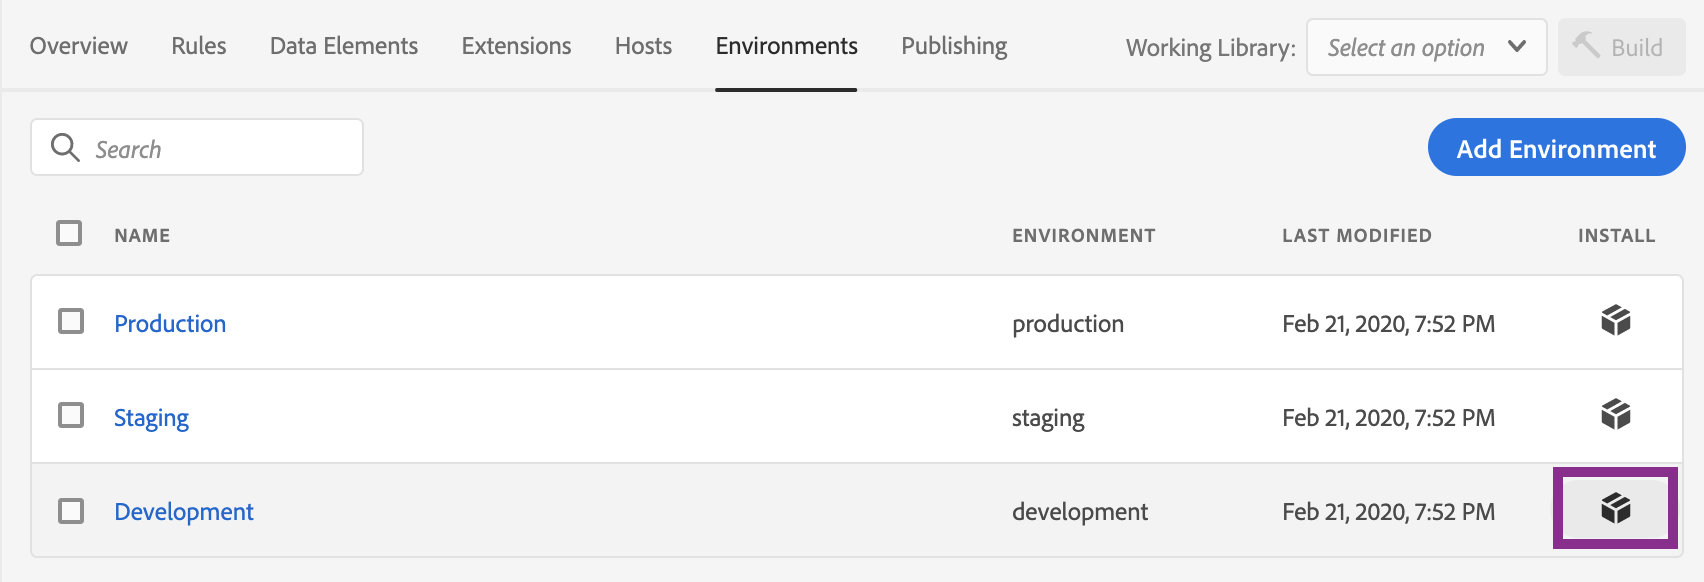
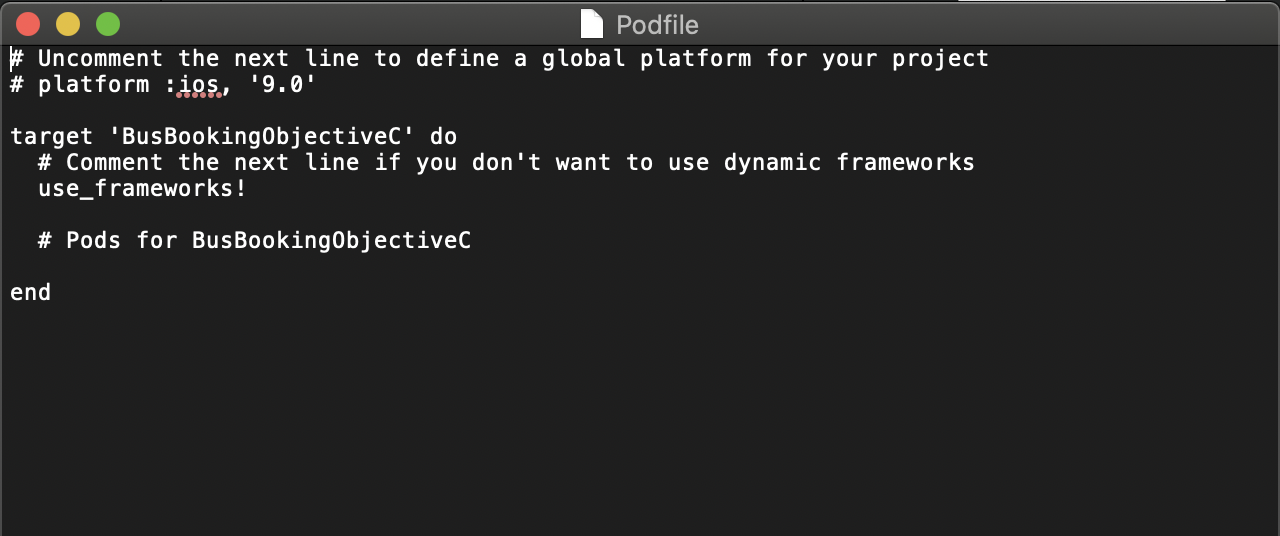
In my implementation I’m going to use the Development library. Once you click the embed box you will see instructions for iOS & Android platforms. The next few steps are a simple copy and paste exercise — you’ll notice that you already have use_frameworks! in your podfile, so just add the other pods that you need below that. The pods displayed in the Launch instructions are automatically generated based on the extensions you have configured, so you don’t need to worry about any mismatches.

Once you’ve copied the dependencies into your podfile you should end up with something that looks similar to the file below. Of course, it depends on which extensions you have configured but I’d expect Core, UserProfile & Griffon, plus each relevant pod for the solutions you’re using.
The final step on the Podfile journey is to run the pod install command. If you didn’t close the terminal after you created the podfile then you will still be in the Objective-C folder, so no need to switch directories like we did earlier when creating the Podfile.
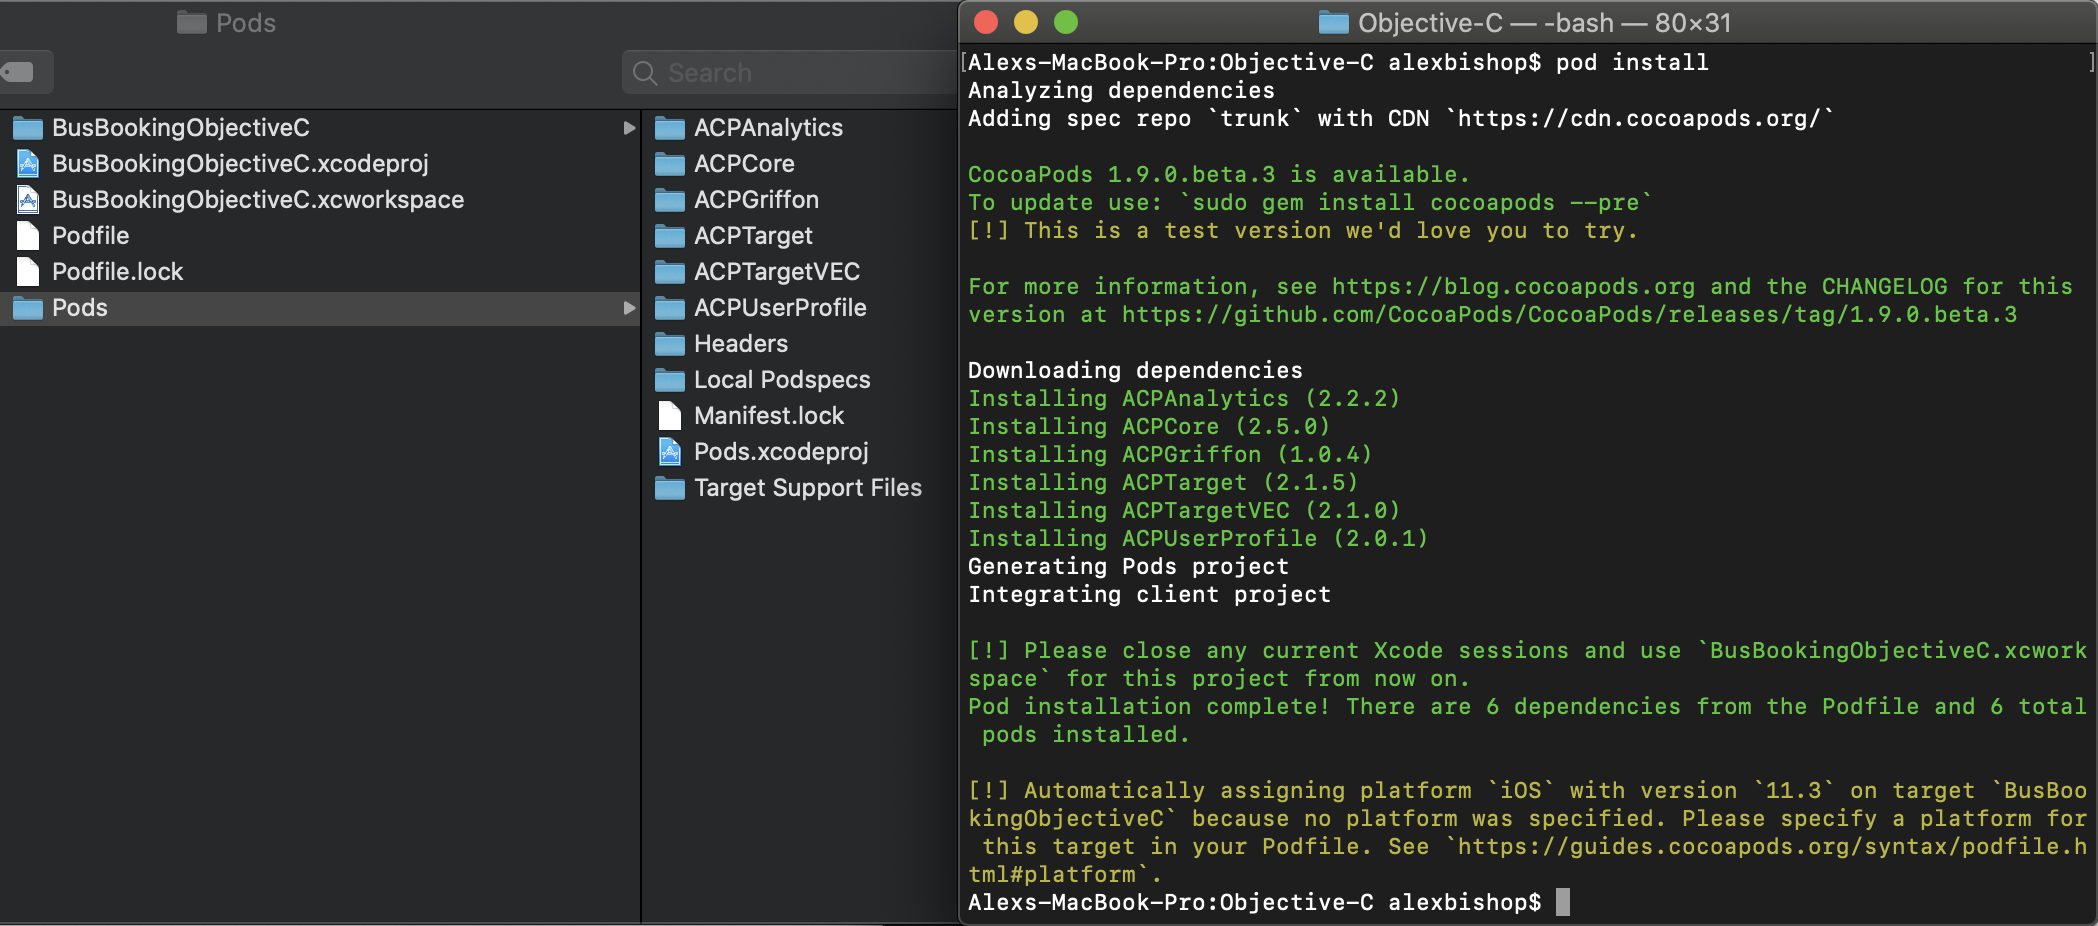
When you run the install command it usually takes at least 30 seconds to complete, so don’t worry too much if progress seems a bit slow. Once the process has finished, you should see a new Pods folder which contains all the dependencies you added to your Podfile, as well as a Podfile.lock file.
There is also a newly created .xcworkspace file, which is why I said earlier not to be tempted to open the .xcodeproj file. As per the instructions logged in the terminal window when you run pod install, you should now only use the .xcworkspace file in Xcode. If you do open the Xcode Project file, you’ll notice that none of your ACP pods exist, which is why the new Xcode Workspace file is needed.
#3 Add ACP import statements
Now the foundations are in place, it’s time to start adding the code that will import and initialise the components that have been set up in Launch. The first thing to do is to add the ACP import statements, so scroll down beyond the pod instructions in Launch and you’ll see what you need to copy across.
Open up the .xcworkspace file and navigate through the folder structure to AppDelegate.m. If you’re using one of the sample apps then there’s only one existing import statement but it’s nice to have something to take you in the right direction if you’re new to Xcode.
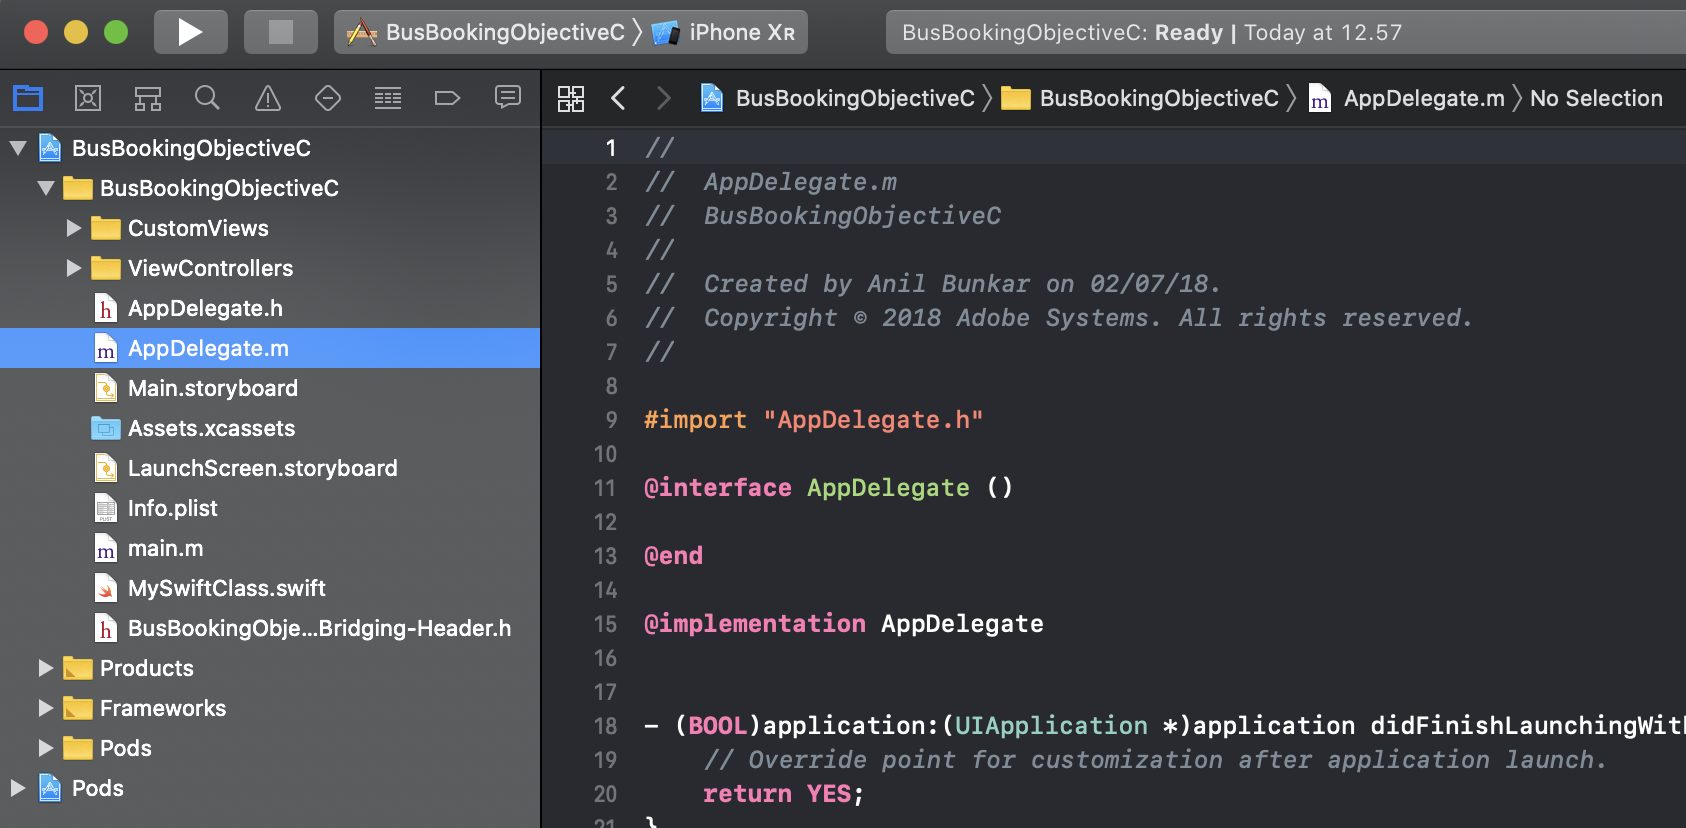
Now it’s just a question of adding your ACP import statements below any existing entries. You should end up with something that looks like the screenshot below.
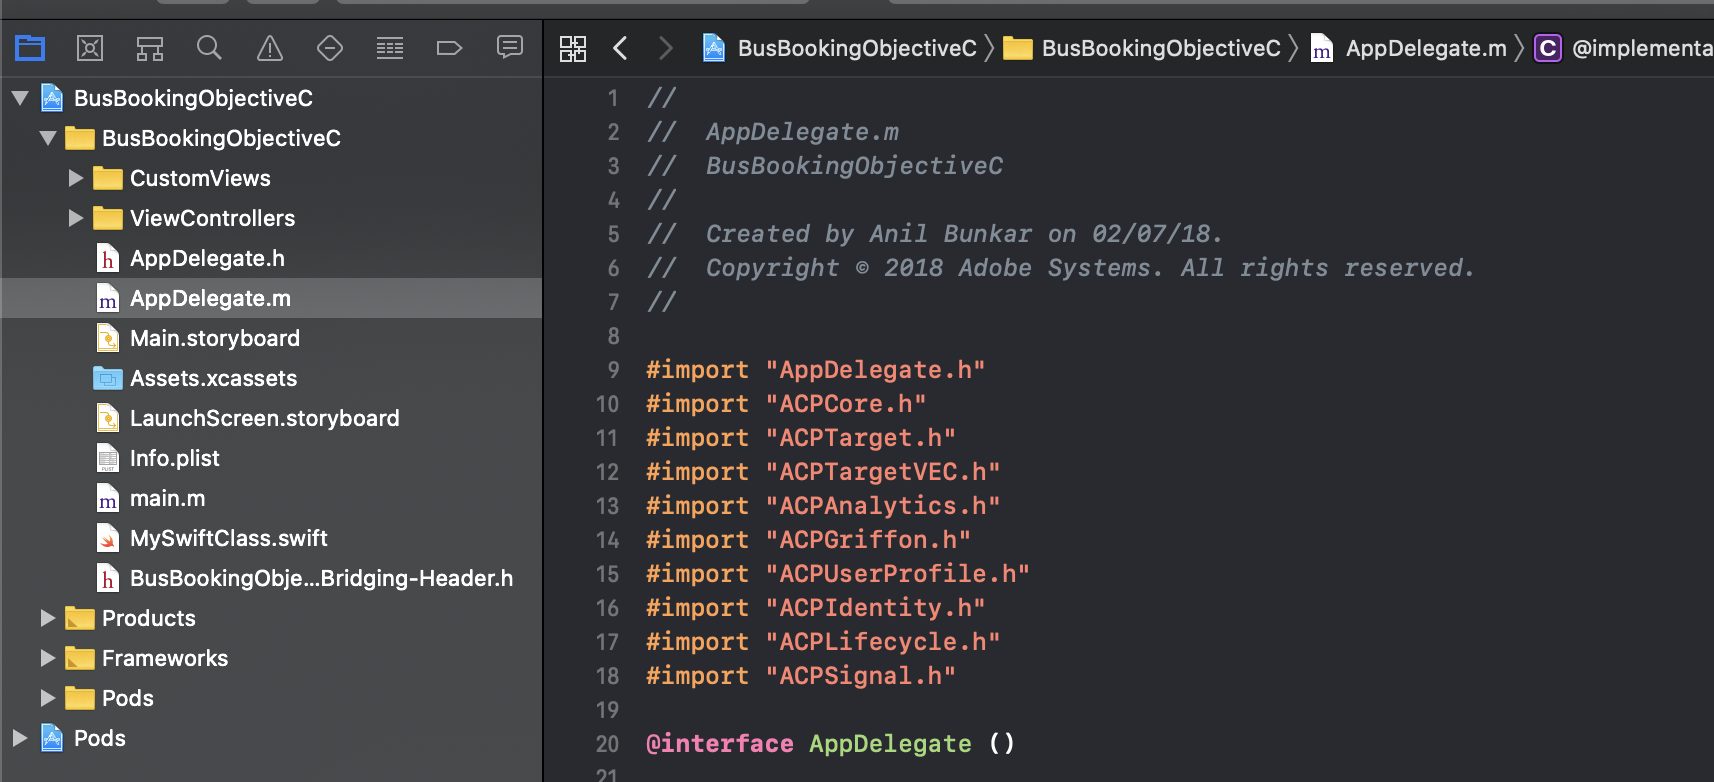
Note: if you’re going to use the Target VEC it is essential that the “ACPTarget.h” import statement comes before “ACPTargetVEC.h”, otherwise any activities that you create on the first page that is displayed on app launch won’t work. At one time, the copy & paste code had these two statements in the incorrect order but that’s been fixed so if you use the copy & paste functionality you won’t go wrong.
#4 Register ACP extensions
Continuing down the Launch instructions list, there are two sections highlighted in bold which need to be added to the didFinishLaunchingWithOptions method.
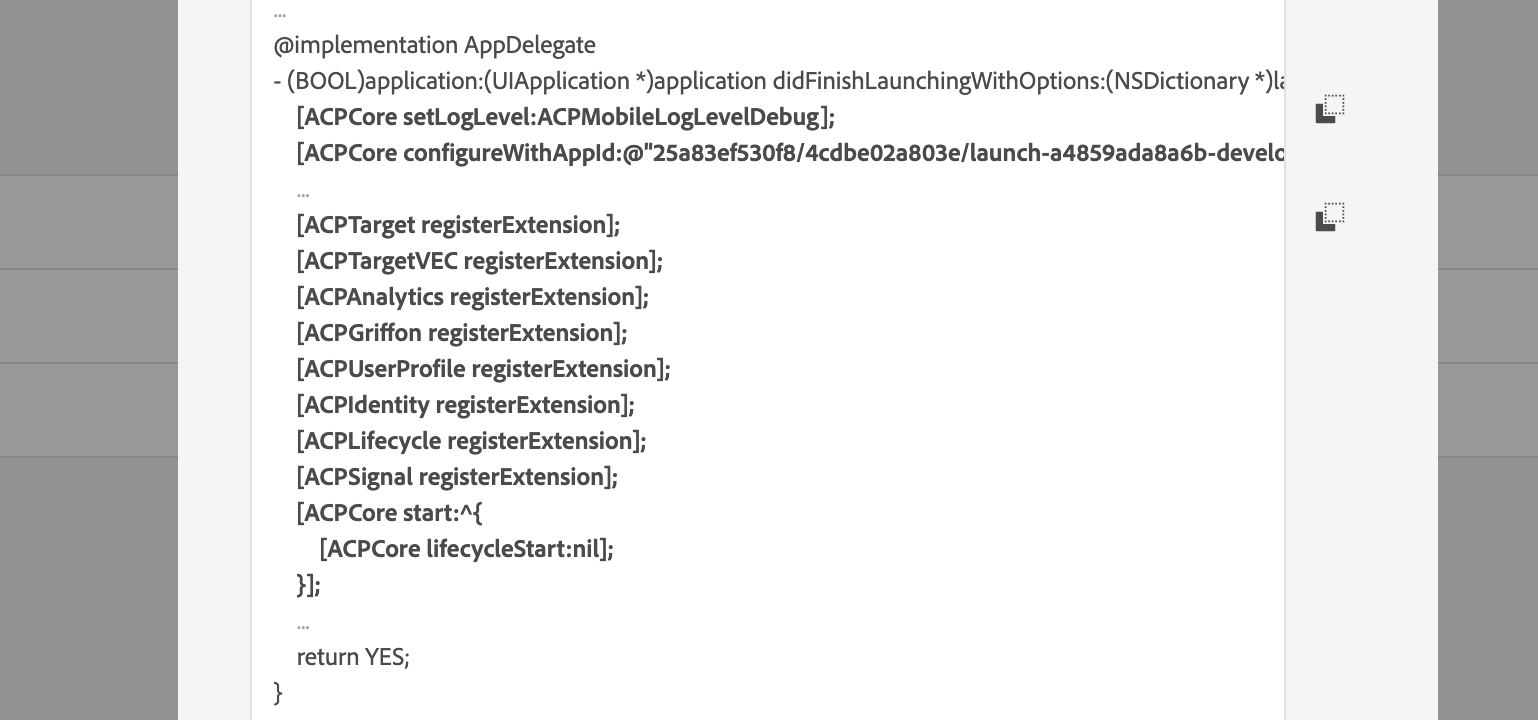
This is a straightforward copy & paste exercise, the only thing to bear in mind is that you need to paste everything within the launchOptions curly brackets but before the final return statement.
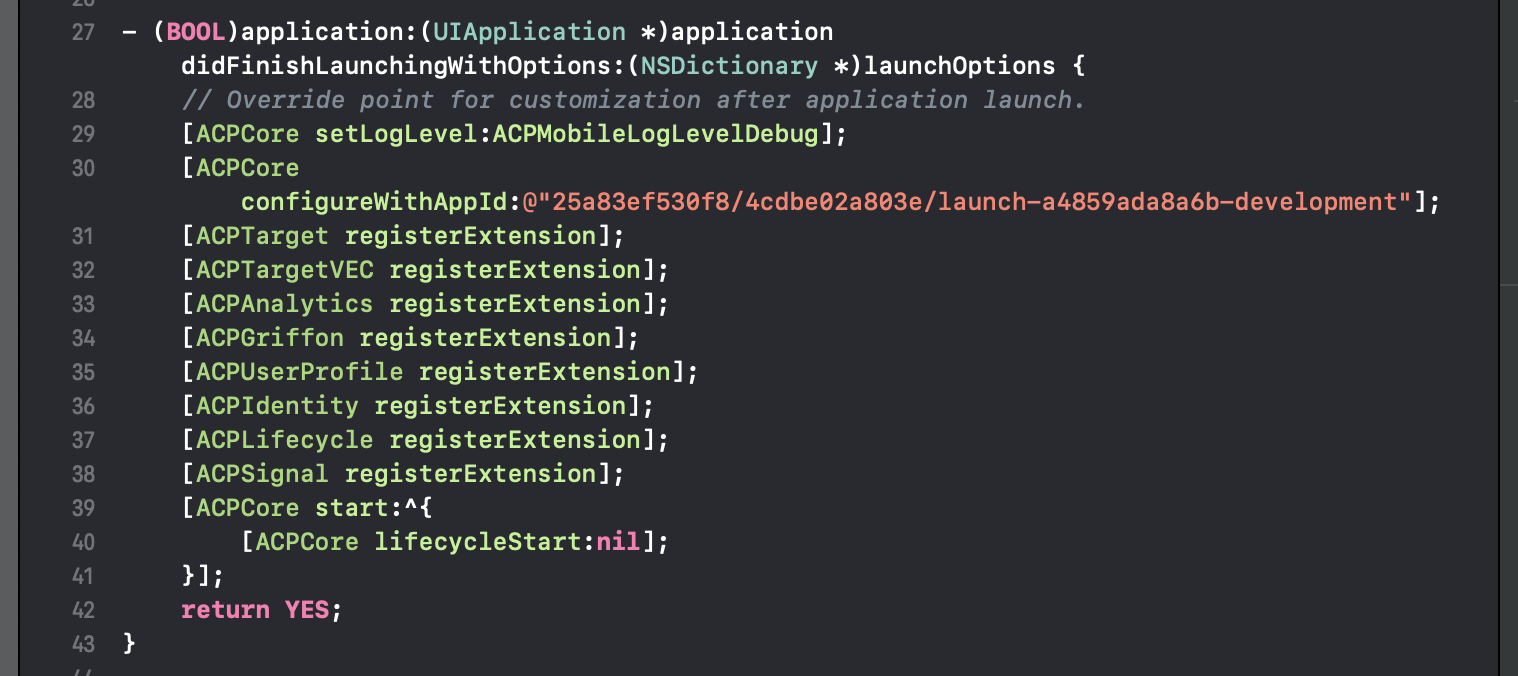
You should now be looking at an AppDelegate.m file that looks something like the one below.

The first thing to note is that in the v4 SDKs, the lifecycle metrics took care of themselves, in the AEP SDKs you need to initiate the lifecycle collection. Having said that, this is very straightforward (see line 40) as it’s taken care of as part of the copy & paste work completed earlier, but it’s still worth bearing in mind.
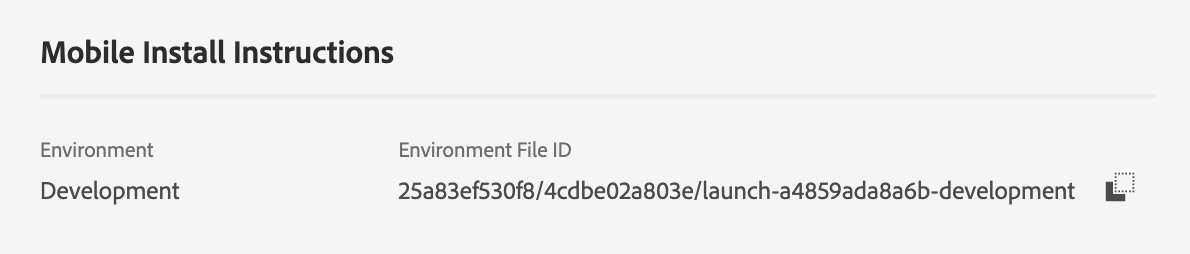
Another value of interest is the configureWithAppId string (line 30) because this should be an exact match for the Environment File ID in Launch. As with a Launch web property, each environment lives in a different location, so you need to ensure your dev and prod apps handle this accordingly.
#5 Start sending data to Analytics
The final piece of the puzzle as far as Analytics is concerned is to make use of the trackState and trackEvent ACPCore methods so that you can start sending data into a report suite.
What “make use of….ACPCore methods” means in reality is very straightforward. Firstly, you need to add your #import “ACPCore.h” statement to the views that you want to track (see line 10). Then you need to call one of the tracking methods — which one you call will depend on whether you’re tracking a “page” view or some sort of event.
If you’re sending a trackState call, as shown in the screenshot above, then you need to provide the page name value (“booking view” in my case). You also have the option of including additional context data in each Analytics call, which you will almost certainly want to do. In the example above I’m just sending a userStatus variable to illustrate how this can be done.
#6 Validate the implementation
At this point I’d suggest building your app (if you haven’t done so already), so you can carry out a quick sanity check to make sure things are working as expected. These checks will rely on the debug logging from the SDK, so if you didn’t add the ACPCore setLogLevel code to your AppDelegate.m file in section 4, you need to add that before you build your app.
Some of the key points to tick off are:
- i) Launch rules success
You should see a “Successfully downloaded Rules from” statement that references your Launch environment ID with “-rules.zip” added onto the end
- ii) Launch configuration settings
Further down in the console statements you should see all of the configuration settings that you implemented in Launch. It’s worth checking through this to make sure that mandatory values like the Analytics report suite id and Target client code are populated.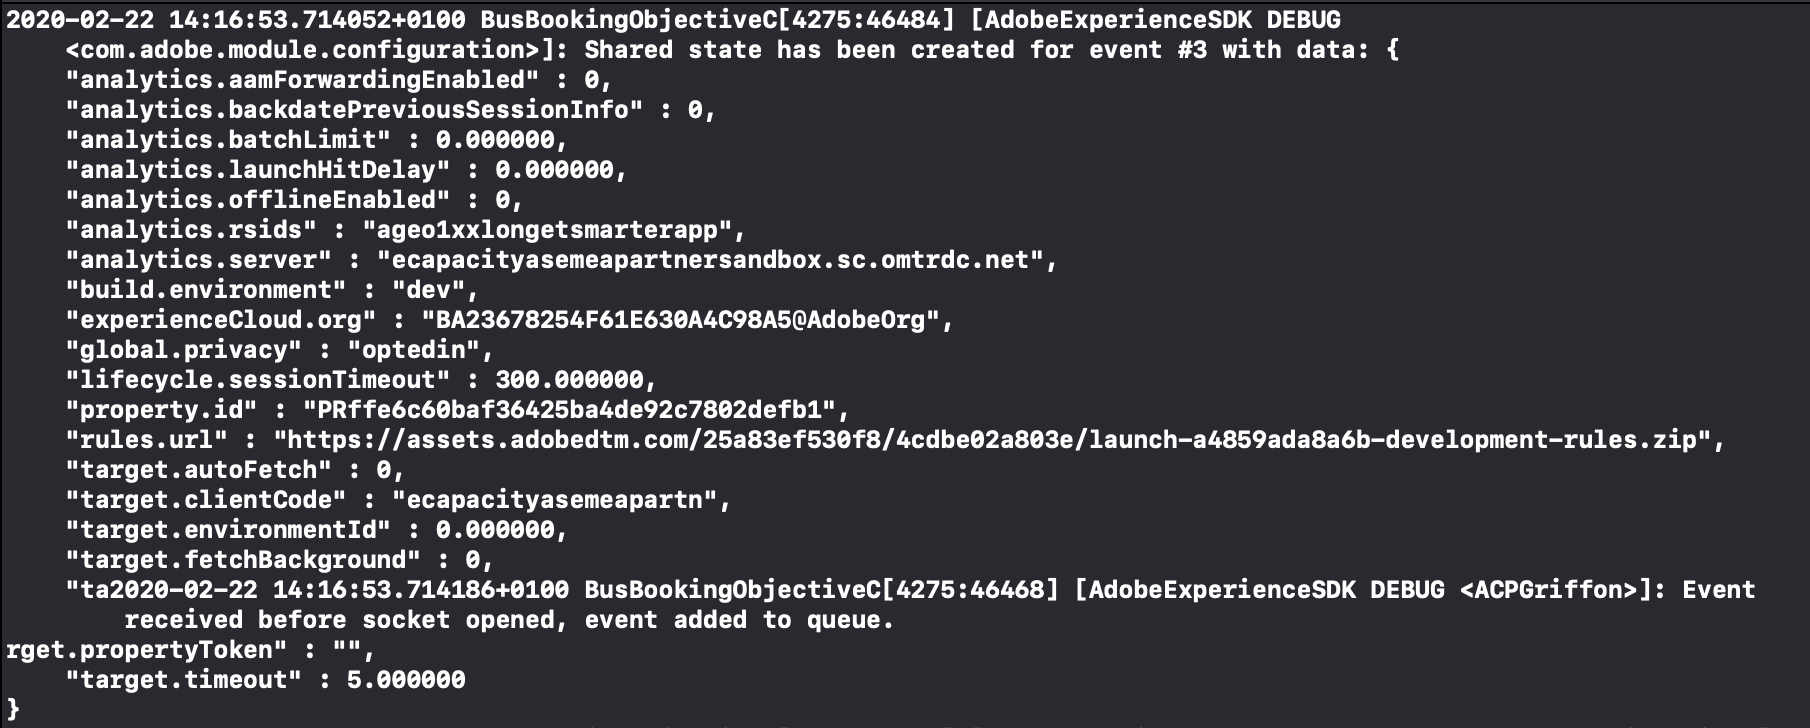
iii) Experience Cloud ID Service
Assuming you have implemented this extension, you should also see a request being made to demdex.net by the Identity service. As long as you see the request being made, and it has a d_mid parameter, then you’re good to go.
- iv) Target request sent
Thinking back to the previous Launch config article, in the VEC Extension you have the option to tell Target to auto-fetch activities when the app loads. If you have this setting enabled, you should see a request automatically sent to Target when your app opened (note: we didn’t even need to add any code to make this happen).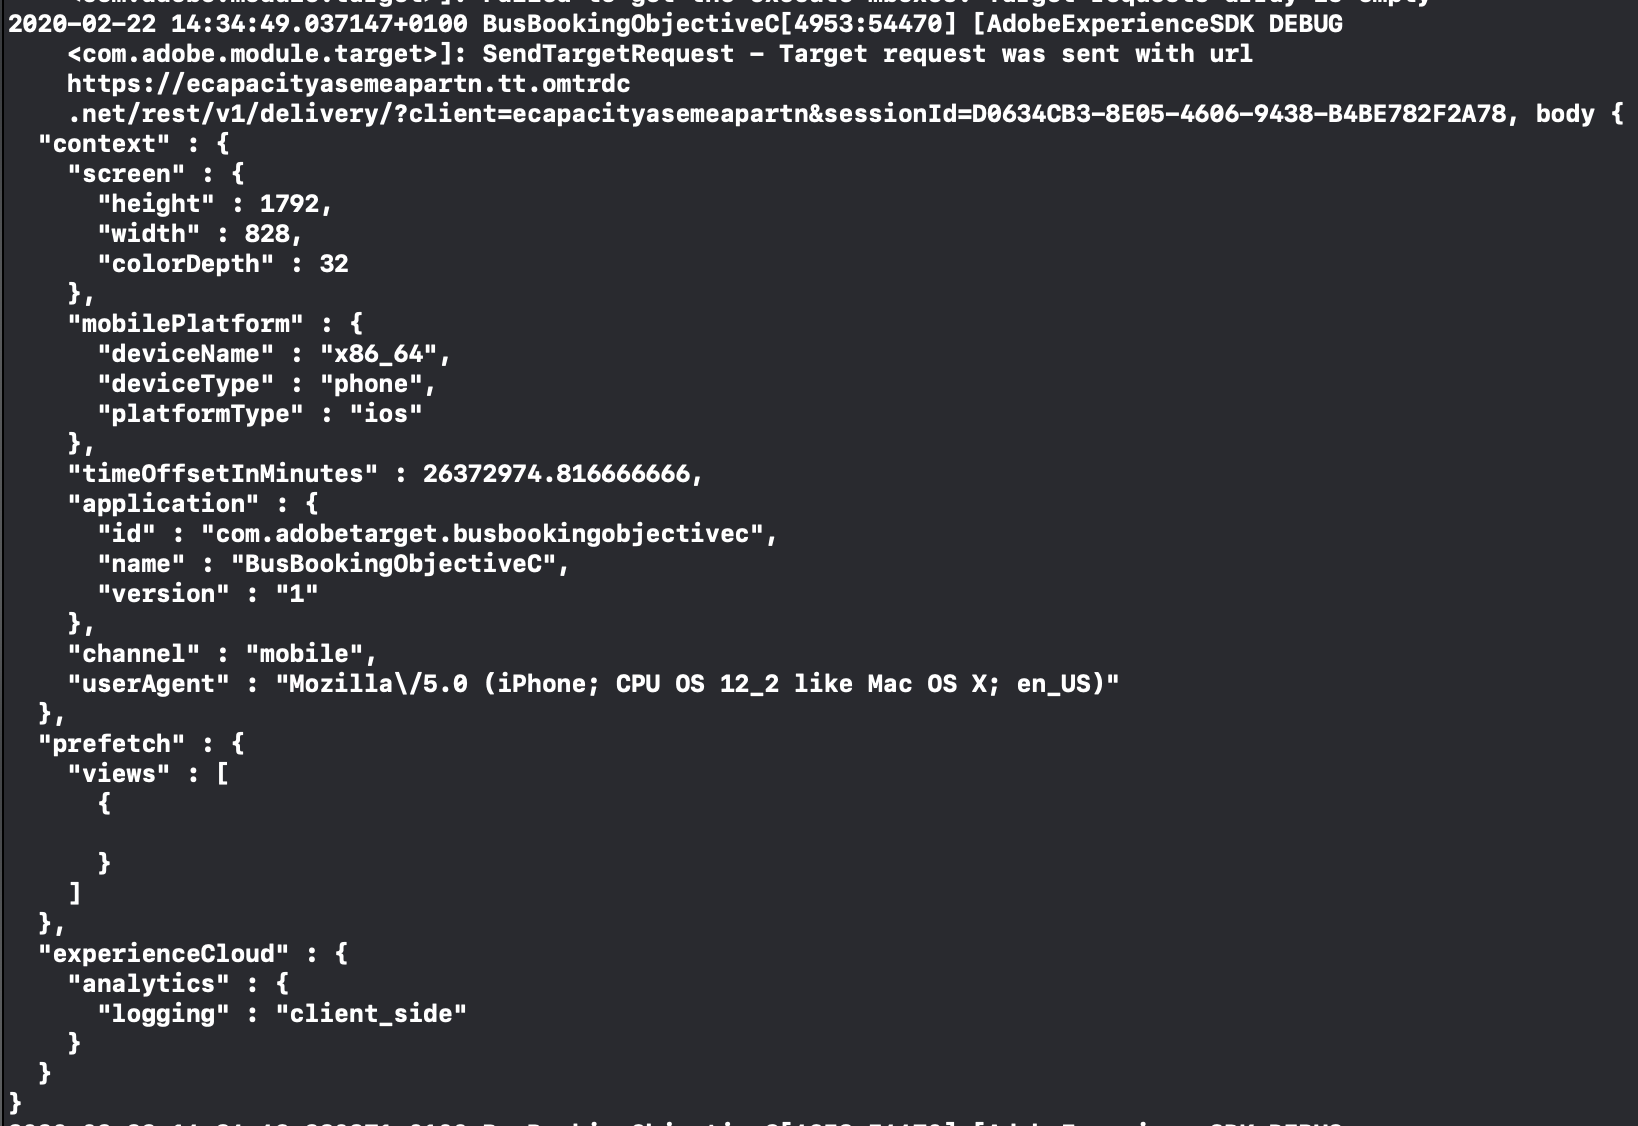
- v) Analytics data is sent successfully
As you scroll further down through the console statements, you will likely first be informed that the Analytics request was queued but if you keep scrolling through you should eventually find confirmation that the Analytics request was sent.
Summary
If you take away any time that might be spent getting familiar with CocoaPods, I hope you would agree that getting a basic implementation up and running, which includes sending Analytics data and perhaps also sending Target requests, is achievable in a relatively short period of time.
I think there are a lot of parallels to be drawn between the AEP SDK implementation and a typical Launch web implementation. The most important aspect is the data, which means that development resources take on a critical role in terms of creating a consistent and reliable data foundation.
In the next few articles I will take a look at some of the options that are available to enhance the Analytics data collection (i.e. the Attach Data action), the additional steps required to implement the Target VEC and create an activity, and a more detailed look into Project Griffon.


