Setup Visual Studio solution
Create a Blank App (Android) project
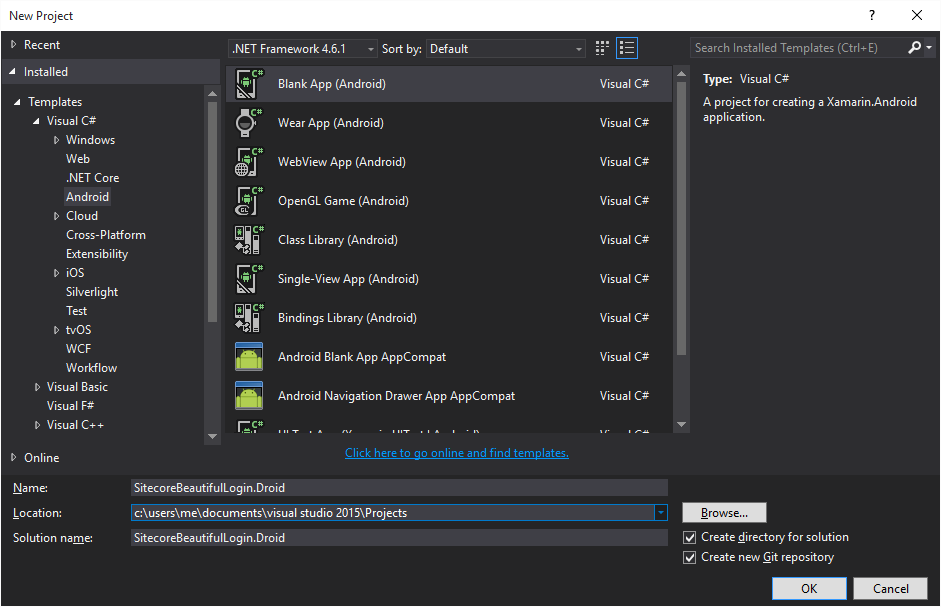
In Visual Studio, select File > New > Project from the menu. In the New Project dialog, select Visual C# > Android on the left, and then Blank App (Android) from the list in the center - this creates a native Android application with the flexibility of using C#.
Select a location for the solution and give it a name, for example SitecoreBeautifulLogin.Droid.
Install Design Android Support Library (Material Design)
The Design Support Library provides APIs to support adding material design components and patterns to your apps.
To setup Design Android Support Library in your app you need to:
- Install Xamarin Android Support Library - Design nuget package;
- Change the "Minimum Android to target" to Android 5.0 (API Level 21 - Lollipop);
- Create a Styles.xml file in your project and create a style that inherits from any of the AppCompat themes (i. e. Theme.AppCompat.Light.DarkActionBar);
- Update your Activity classes (i. e. MainActivity.cs) to inherit from Android.Support.V7.App.AppCompatActivity class rather than Activity class;
- Update the attribute of all Activity classes adding the parameterTheme to use any style that inherits from AppCompat theme.
Install Xamarin Android Support Library - Design nuget package
You can use either the Nuget Package Manager (Tools > Nuget Package Manager > Manage Nuget Packages for Solution...) or install it through Package Manager Console (Tools > Nuget Package Manager > Package Manager Console):
PM> Install-Package Xamarin.Android.Support.Design
Please read Xamarin Android Support Library - Design for more information.
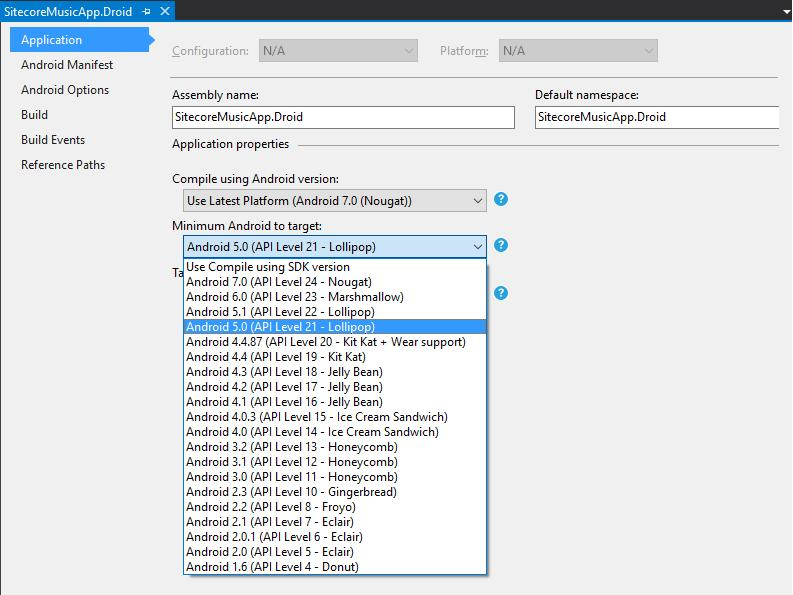
Change the "Minimum Android to target" to Android 5.0 (API Level 21 - Lollipop)
Using Design Support Library requires that your app have its Target Android Version (*targetSdkVersion*) set to Lollipop (5.0 - API Level 21) or higher, or you will have aapt related compile errors. You can still set the Target Framework which your app is compiled against as low as Android 4.0.3 (API Level 15). See Android Support Design Library > Getting Started for more information.
In your Visual Studio project, change the "Minimum Android to target" to Android 5.0 (API Level 21 - Lollipop) by right-clicking on your project in the Solution Explorer > Properties (or click on your project in the Solution Explorer and press ALT + ENTER).
Create a style that inherits from any of the AppCompat themes
If you want to use the Design Support Library views, you must either use the theme Theme.AppCompat or inherit from Theme.AppCompat found in the AppCompat v7 Support library.
Create the files Colors.xml, Dimens.xml and Styles.xml under the folder /Resources/values in your project.
Add the following to your Colors.xml file:
<?xml version="1.0" encoding="utf-8" ?>

<resources>

   <color name="primary">#E43F3F</color>

   <color name="primary_dark">#E12929</color>

   <color name="primary_darker">#CC1D1D</color>

   <color name="accent">#FFFFFF</color>

   <color name="black">#000000</color>

   <color name="jet">#222222</color>

   <color name="oil">#333333</color>

   <color name="monsoon">#777777</color>

   <color name="jumbo">#888888</color>

   <color name="aluminum">#999999</color>

   <color name="base">#AAAAAA</color>

   <color name="iron">#CCCCCC</color>

   <color name="white">#FFFFFF</color> </resources>
Add the following to your Dimens.xml file:
<?xml version="1.0" encoding="utf-8" ?>

<resources>

   <dimen name="document_cover_height">160dp</dimen>

   <dimen name="document_title_padding">10dp</dimen>

   <dimen name="document_title">15dp</dimen>

   <dimen name="document_padding_bottom">5dp</dimen>

   <dimen name="document_description">12dp</dimen>

   <dimen name="document_card_margin">5dp</dimen>

   <dimen name="document_card_radius">0dp</dimen>

   <dimen name="activity_horizontal_margin">16dp</dimen>

   <dimen name="activity_vertical_margin">16dp</dimen> </resources>
Add the following to your Styles.xml file:
<?xml version="1.0" encoding="utf-8" ?>

<resources>

   <!-- Base application theme. -->

   <style name="AppTheme" parent="Theme.AppCompat.Light.DarkActionBar">

     <!-- Customize your theme here. -->

   </style>   <style name="AppTheme.Dark" parent="Theme.AppCompat.NoActionBar">

     <item name="colorPrimary">@color/primary</item>

     <item name="colorPrimaryDark">@color/primary_dark</item>

     <item name="colorAccent">@color/accent</item>

     <item name="android:windowBackground">@color/primary</item>

     <item name="colorControlNormal">@color/iron</item>

     <item name="colorControlActivated">@color/white</item>

     <item name="colorControlHighlight">@color/white</item>

     <item name="android:textColorHint">@color/iron</item>

     <item name="colorButtonNormal">@color/primary_darker</item>

     <item name="android:colorButtonNormal">@color/primary_darker</item>

   </style>

   <style name="AppTheme.Dark.Dialog" parent="Theme.AppCompat.Dialog">

     <item name="colorAccent">@color/white</item>

     <item name="android:textColorPrimary">@color/iron</item>

     <item name="android:background">@color/primary</item>

   </style>

</resources>
Update MainActivity class
In MainActivity.cs do the following changes:
using Android.App;

using Android.OS;

namespace SitecoreBeautifulLogin.Droid

{

     [Activity(Label = "@string/ApplicationName", Icon = "@drawable/icon", Theme = "@style/AppTheme.Dark")]

     public class MainActivity : Activity

     {

         protected override void OnCreate(Bundle bundle)

         {

             base.OnCreate(bundle);

             // Set our view from the "main" layout resource

              SetContentView (Resource.Layout.Main);

         }

     }

}
If you want to use the Design Support Library views, you must either use the theme Theme.AppCompat or inherit from Theme.AppCompat found in the AppCompat v7 Support library. In our case we are using the custom theme AppTheme.Dark which inherits from Theme.AppCompat.NoActionBar (see Styles.xml).
Install Sitecore Mobile SDK for Xamarin nuget packages
Install Sitecore Mobile SDK for Xamarin and Sitecore Mobile SDK Password Provider nuget packages. You can use either the Nuget Package Manager (Tools > Nuget Package Manager > Manage Nuget Packages for Solution...) or install it through Package Manager Console (Tools > Nuget Package Manager > Package Manager Console):
PM> Install-Package Sitecore.MobileSDK.Xamarin

PM> Install-Package Sitecore.MobileSDK.PasswordProvider
Please, read Sitecore MobileSDK for Xamarin and Password Provider for Sitecore for more information.
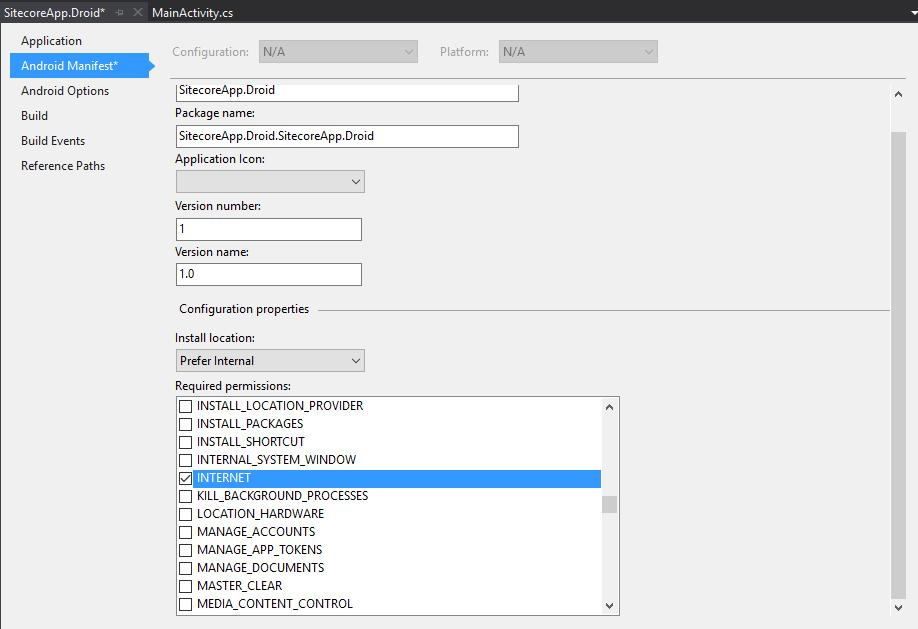
Add internet permission to Android Manifest file
Add Internet permission to Android Manifest file by right-clicking your project in the Solution Explorer > Properties (or click on your project in the Solution Explorer and press ALT + ENTER).
Now open the Android Manifest tab and in the Required permissions section mark the option INTERNET. Save and rebuild your Solution.
Create “Constants” class
First, let's create a class responsible for storing all default values related to our Sitecore instance. In your project directory, create a class named "Constants" and add the following code:
namespace SitecoreBeautifulLogin.Droid
{
public class Constants
{
public struct Sitecore
{
public const string RestBaseUrl = "http://sitecoresandbox.local.nlc";
public const string SitecoreUserName = "admin";
public const string SitecorePassword = "b";
public const string SitecoreShellSite = "/sitecore/shell";
public const string SitecoreDefaultDatabase = "master";
public const string SitecoreDefaultLanguage = "en";
public const string SitecoreMediaLibraryRoot = "/sitecore/media library";
public const string SitecoreMediaPrefix = "~/media/";
public const string SitecoreDefaultMediaResourceExtension = "ashx";
}
}
}
Don’t forget to update the constant RestBaseUrl with your current Sitecore instance URL.
Create “SitecoreService” class
Now we are going to create a class named “SitecoreService” which will be responsible for creating a session in Sitecore and authenticating the credentials provided. Add the following code to the SitecoreService.cs:
using Sitecore.MobileSDK.API;

using Sitecore.MobileSDK.API.Session;

using Sitecore.MobileSDK.PasswordProvider;

using Sitecore.MobileSDK.PasswordProvider.Interface;

using System.Threading.Tasks;


namespace SitecoreBeautifulLogin.Droid.Services

{

     public class SitecoreService

     {

         public async Task<bool> Authenticate(string login, string password)

         {

             using (ISitecoreWebApiSession session = GetSession(login, password))

             {

                 return await session.AuthenticateAsync();

             }

         }

         private ISitecoreWebApiSession GetSession(string userName = "", string password = "")

         {             if (string.IsNullOrEmpty(userName))

             {

                 userName = Constants.Sitecore.SitecoreUserName;

                 password = Constants.Sitecore.SitecorePassword;

             }

             using (IWebApiCredentials credentials = new SecureStringPasswordProvider(userName, password))

             {                 ISitecoreWebApiSession session = SitecoreWebApiSessionBuilder.AuthenticatedSessionWithHost(Constants.Sitecore.RestBaseUrl)

                     .Credentials(credentials)

                     .Site(Constants.Sitecore.SitecoreShellSite)

                     .DefaultDatabase(Constants.Sitecore.SitecoreDefaultDatabase)

                     .DefaultLanguage(Constants.Sitecore.SitecoreDefaultLanguage)

                     .MediaLibraryRoot(Constants.Sitecore.SitecoreMediaLibraryRoot)

                     .MediaPrefix(Constants.Sitecore.SitecoreMediaPrefix)

                     .DefaultMediaResourceExtension(Constants.Sitecore.SitecoreDefaultMediaResourceExtension)

                     .BuildSession();

                 return session;

             }

         }

     }

}
In the code above we have two main methods:
- GetSession: creates a session with Sitecore and returns an instance of ISitecoreWebApiSession, which is required to return items from Sitecore;
- Authenticate: invokes AuthenticateAsync(), which is a Sitecore Mobile SDK method responsible for authenticating the credentials passed and returns true if the credentials are valid.
Create a new Android layout for the login screen
Let’s create a new Android layout. Right-click on Resources/layout > Add > New Item > Android Layout > name it “Login” > and then click on Add:
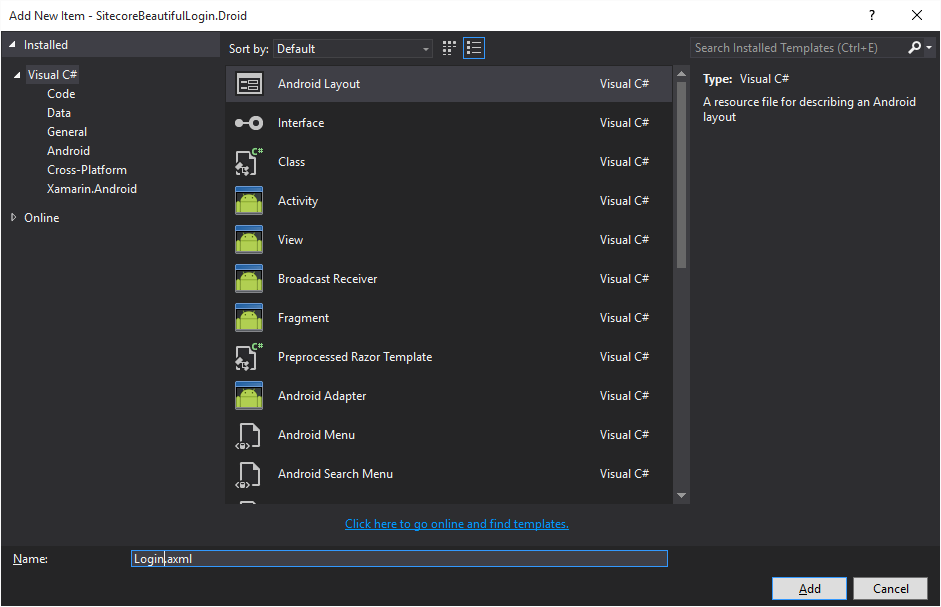
Update Resources/layout/Login.axml with the following code:
<?xml version="1.0" encoding="utf-8"?>

<ScrollView xmlns:android="http://schemas.android.com/apk/res/android"

     android:layout_width="fill_parent"

     android:layout_height="fill_parent"

     android:fitsSystemWindows="true">

     <LinearLayout

         android:orientation="vertical"

         android:layout_width="match_parent"

         android:layout_height="wrap_content"

         android:paddingTop="56dp"

         android:paddingLeft="24dp"

         android:paddingRight="24dp">

         <ImageView

             android:src="@drawable/Logo"

             android:layout_width="match_parent"

             android:layout_height="124dp"

             android:layout_marginBottom="24dp"

             android:layout_gravity="center_horizontal"

             android:scaleType="fitCenter" />

         <android.support.design.widget.TextInputLayout

             android:layout_width="match_parent"

             android:layout_height="wrap_content"

             android:layout_marginTop="8dp"

             android:layout_marginBottom="8dp">

             <EditText

                 android:id="@+id/login_user_text"

                 android:layout_width="match_parent"

                 android:layout_height="wrap_content"

                 android:hint="User" />

         </android.support.design.widget.TextInputLayout>

         <android.support.design.widget.TextInputLayout

             android:layout_width="match_parent"

             android:layout_height="wrap_content"

             android:layout_marginTop="8dp"

             android:layout_marginBottom="8dp">

             <EditText

                 android:id="@+id/login_password_text"

                 android:layout_width="match_parent"

                 android:layout_height="wrap_content"

                 android:inputType="textPassword"

                 android:hint="Password" />

         </android.support.design.widget.TextInputLayout>

         <android.support.v7.widget.AppCompatButton

             android:id="@+id/login_button"

             android:layout_width="fill_parent"

             android:layout_height="wrap_content"

             android:layout_marginTop="24dp"

             android:layout_marginBottom="24dp"

             android:padding="12dp"

             android:text="Login" />

     </LinearLayout> </ScrollView>
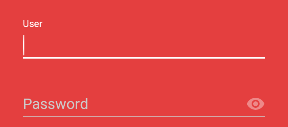
In the code above you will notice that we are using the widget TextInputLayout. TextInputLayout was added to the design support library (Material Design) and it wraps, EditText and allows the android:hint attribute of the EditText to float above the EditText for constant viewing.
We are using a custom image for the logo android:src="@drawable/Logo".
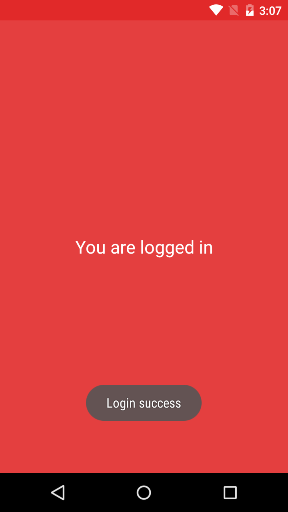
Let’s update Resources\layout\Main.axml with the following code:
<?xml version="1.0" encoding="utf-8"?>

<LinearLayout xmlns:android="http://schemas.android.com/apk/res/android"

     android:orientation="vertical"

     android:layout_width="match_parent"

     android:layout_height="match_parent"

     android:minWidth="25px"

     android:minHeight="25px"

     android:gravity="center">

     <TextView

         android:text="You are logged in"

         android:textAppearance="?android:attr/textAppearanceLarge"

         android:layout_width="match_parent"

         android:layout_height="wrap_content"

         android:gravity="center" />

</LinearLayout>
Here, we added text "You are logged in" that will be viewed after we successfully authenticate to Sitecore.
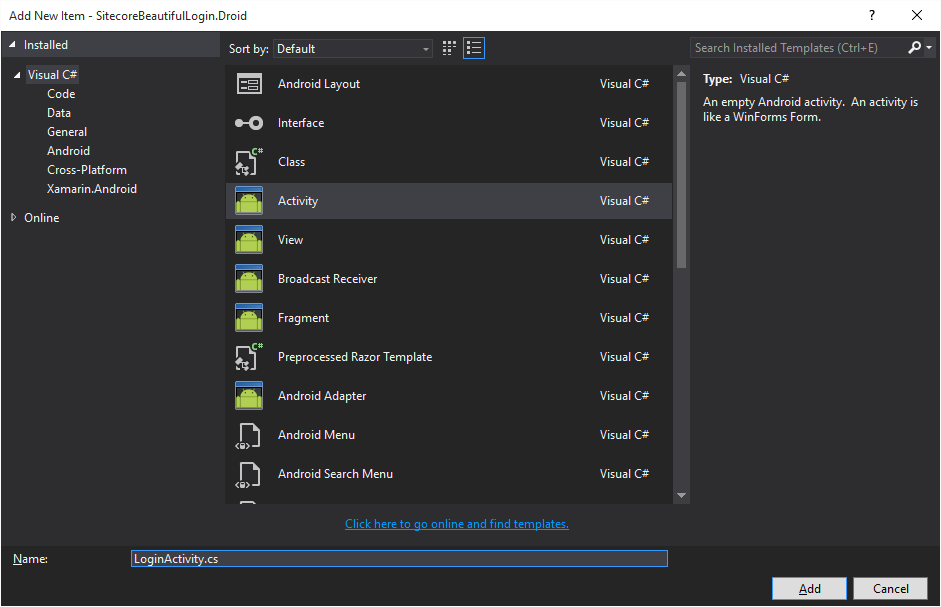
Create a new Android Activity for the login screen
Let’s create a new Android Activity. Right-click on your project > Add > New Item > Activity > name it “LoginActivity” > and then click on Add:
Update LoginActivity.cs with the following code:
using Android.App;
using Android.Content;
using Android.OS;
using Android.Widget;
using SitecoreBeautifulLogin.Droid.Services;
using System;
using System.Threading.Tasks;
namespace SitecoreBeautifulLogin.Droid
{
[Activity(Label = "@string/ApplicationName", MainLauncher = true, Icon = "@drawable/icon", Theme = "@style/AppTheme.Dark")]
public class LoginActivity : Activity
{
private EditText userText;
private EditText passwordText;
private Button loginButton;
private SitecoreService sitecoreService;
protected override void OnCreate(Bundle savedInstanceState)
{
base.OnCreate(savedInstanceState);
SetContentView(Resource.Layout.Login);
userText = FindViewById<EditText>(Resource.Id.login_user_text);
passwordText = FindViewById<EditText>(Resource.Id.login_password_text);
loginButton = FindViewById<Button>(Resource.Id.login_button);
loginButton.Click += LoginButtonClicked;
sitecoreService = new SitecoreService();
}
private async void LoginButtonClicked(object sender, EventArgs e)
{
if (!ValidateLogin())
{
OnLoginFailed();
return;
}
loginButton.Enabled = false;
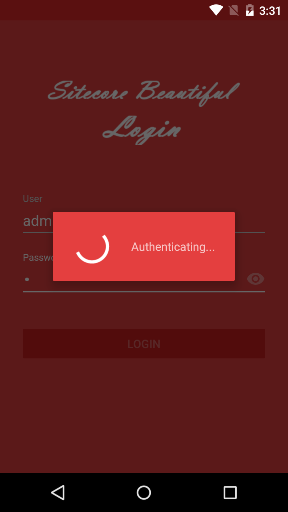
ProgressDialog progressDialog = new ProgressDialog(this, Resource.Style.AppTheme_Dark_Dialog);
progressDialog.Indeterminate = true;
progressDialog.SetMessage("Authenticating...");
progressDialog.Show();
string login = userText.Text;
string password = passwordText.Text;
string message = string.Empty;
try
{
Task<bool> authentication = sitecoreService.Authenticate(login, password);
bool isAuthenticated = await authentication;
if (isAuthenticated)
{
OnLoginSuccess();
}
else
{
OnLoginFailed();
Toast.MakeText(this, "User/Password invalid", ToastLength.Long).Show();
}
}
catch (Exception ex)
{
Toast.MakeText(this, string.Format("An exception occurred {0}", ex.Message), ToastLength.Long).Show();
}
finally
{
progressDialog.Dismiss();
}
}
private void OnLoginSuccess()
{
Toast.MakeText(this, "Login success", ToastLength.Long).Show();
loginButton.Enabled = true;
var intent = new Intent(this, typeof(MainActivity));
StartActivity(intent);
}
private void OnLoginFailed()
{
loginButton.Enabled = true;
}
private bool ValidateLogin()
{
bool valid = true;
string user = userText.Text;
string password = passwordText.Text;
if (string.IsNullOrEmpty(user))
{
userText.Error = "Enter a valid user";
valid = false;
}
else
{
userText.Error = null;
}
if (string.IsNullOrEmpty(password))
{
passwordText.Error = "Enter your password";
valid = false;
}
else
{
passwordText.Error = null;
}
return valid;
}
}
}
In the code above, we have the following methods:
- OnCreate: this is the first method that will be called and is responsible for instantiating the screen controls (user, password, button) and creating an instance of the SitecoreService. On top of that, this method is responsible for binding the click event to the login button;
- OnLoginSuccess: this method will be called once the user successfully authenticates to Sitecore and is responsible for starting the MainActivity and thus showing the Android layout with the message “You are logged in”;
- OnLoginFailed: this method will be called if the user fails to authenticate to Sitecore;
- ValidateLogin: this method is responsible for validating the data inserted in user and password fields. Notice that to set an error you need to update the property Error of the user and password fields that are an EditText;
- LoginButtonClicked: this method will be called once the user clicks the login button. This method is responsible for invoking the Authenticate method of the SitecoreService class and redirecting the execution to the method OnLoginSuccess or OnLoginFailed depending on the result. Additionally, we added a ProgressDialog which will add a spinning icon in the middle of the screen so that the user will know that his authentication is still processing.
That all for today, folks!


